
Introduction
That’s it! We are at the beginning of a project and we have just managed to develop a program that works and meets the requirements. Perfect then, all that’s left to do is deliver to production…
Yes, but… questions immediately arise:
Environmental compatibility: Does the program work the same in different environments? For example, it might work on development, but what about the production server? Differences in configurations, dependency versions, or even the operating system can cause unexpected malfunctions.
Dependency Management: How will we manage the program’s dependencies? If the program depends on specific libraries, how do we ensure that these libraries will be available and compatible on the production server?
Portability: how to ensure that our application is easily deployable on different infrastructures, whether locally, on on-site servers or in the cloud?
Isolation: How can we ensure that our program will not cause conflicts with other applications or services on the same server? Isolation of runtime environments is crucial to avoid interference issues.
Scalability: Is our program ready to scale? If we need more power or have to handle an increase in the number of users, how will we adapt our deployment?
Maintenance and updates: How will we manage program updates? Is it possible to update or patch our application without causing service interruptions?
Security: What are the security implications when deploying our application? How will we protect our application from vulnerabilities, unauthorized access, and other threats?
To answer these questions and facilitate the deployment of our application, an effective solution is containerization.
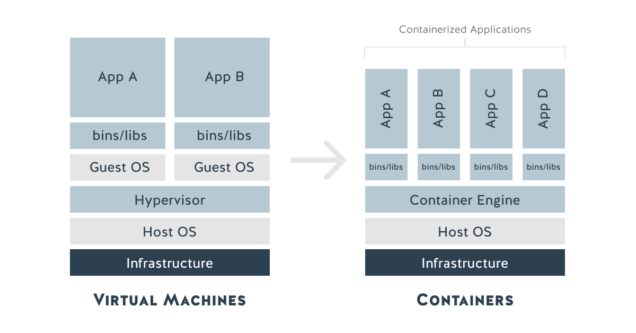
Containerization is a method of encapsulating an application and all its dependencies in a lightweight, portable, and self-sufficient container. This approach offers several advantages:
- Uniformity: Containers help ensure that the program works the same way regardless of the environment by encapsulating all necessary dependencies.
- Isolation: each container is isolated from the others, which avoids dependency conflicts and interference between applications.
- Portability: Containers can be easily deployed on different platforms, whether on local machines, on-premises servers or in the cloud.
- Scalability: Containers can be easily replicated and orchestrated to meet scalability needs.
By adopting containerization, we can make our application more robust, flexible, and easy to manage. In the following sections, we will start from the case study of this website delivered in containerized form and propose an automated build process in Gitlab CI.
Use case
We will consider the case of this site which consists of:
- an executable compiled in Go language (back-end)
- static files (HTML pages, scripts, CSS, media) and dynamic files (HTML templates) served by the web server
- a Sqlite database containing the definition of articles and tags
Due to their different lifecycle, we have chosen to separate the actual website from the articles into two different Gitlab projects: Website Core for the engine of the site and Website Data for the management of the articles as well as the Sqlite database.
Since the website only uses the HTTP protocol (to keep the code simple), it will run behind a reverse proxy which will manage the SSL part with the certificates.
We thus perceive all the interest of containerization which allows the reverse proxy and the site to communicate in a sealed network exposing only port 443 dedicated to https communications to the outside.
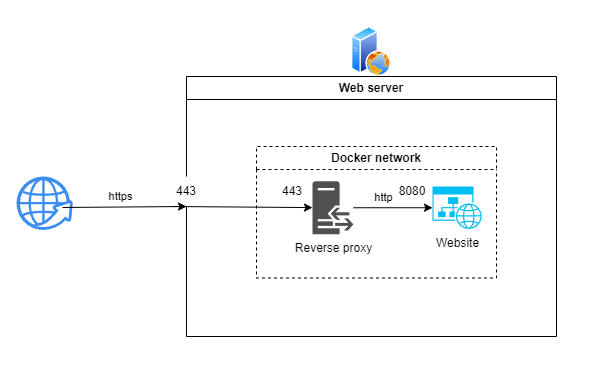
It is also obvious that the different services of the application as a whole (here the reverse proxy and the website) will each have their own environment in complete autonomy, without dependency conflicts.
The containerization challenge that we are going to detail therefore consists of:
- generate a secure and most economical Docker image possible for the website
- integrate the generation of this image and the deployment of the container into the CI/CD process (here with Gitlab)
Containerize the application with Docker
We consider as prerequisite the installation of Docker Engine or Docker Desktop on the environment where the website is developed.
There are alternatives to Docker as a container execution system: Podman, LXC, rkt, CRI-O, containerd which may have characteristics more suited to the application that one wishes to containerize.
Analyze the code and its dependencies
The first question to ask is: what does my application absolutely need to run?
The Website Core project consists of a back-end developed in Go language and static or dynamic files (i.e. with content edited by the Go program). The website generated by the previous project will have to serve articles in the form of HTML pages and a Sqlite database composed of a file from the Website Data project.
We can already notice that:
- the Go language is a compiled language: there is no need to deploy the code but simply the executable generated by the compilation.
- no need either for the dependencies that allowed this compilation: you just have to make sure that the OS that was used for it and that of the container in which the application will run are identical.
- to work, the application only needs the static/dynamic files of the Website Core project. Articles and database can be associated with it later.
Determine persistent data
As we have just discussed, a distinction must be made between what constitutes the core of the application ensuring its essential functioning which will constitute the container itself, and the data which must be stored and/or modified from the outside (configuration, database or data files).
The official documentation explains that the Docker storage system is based on:
- write-only and persistent layers that contain the image
- a read-write layer for each running container
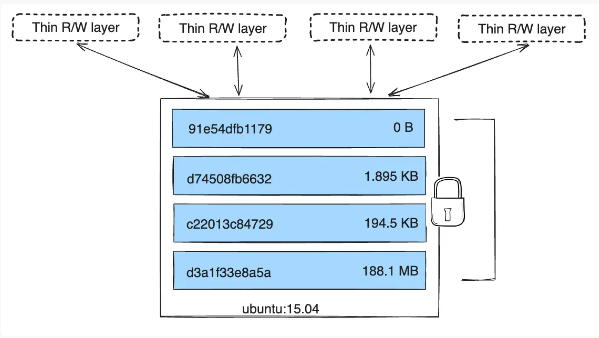
This way, all data modified in a container is modified in the ephemeral read-write layer which is therefore deleted when the container is stopped.
Fortunately, Docker offers the notion of volume which allows to mount directories/files shared between the container and its host in order to keep persistent or externally modifiable data. This also has the advantage of limiting the size of the Docker image by keeping only what is necessary to run the corresponding container.
The use of the term volume is an abuse of language that groups together different elements adapted to this or that use case: the volumes themselves stored on the host in a directory managed by Docker Engine dedicated to persistent data (database, …), the bind mounts which mount a file/folder location defined by the user on the host in the container (preferable if you want to easily modify/read these contents) and the tmpfs mounts which create a temporary filesystem in memory to allow containers to share data without writing to disk, as for a cache system.
For our case, we will need to store the following data on the host:
- Database: this is a Sqlite file stored in the Website Data project. As it is not modified by the application itself which only makes read requests but only delivered from the Gitlab project, it will be relevant to set up a bind mount in order to be able to access the file in the container and replace it.
- Articles: as for the database, a bind mount must be provided in order to be able to regularly update the articles (HTML pages and images) without delivering a new Docker image of the application.
- Logs: here too a bind mount is required to be able to directly read the logs without entering the container, and store the history on the host.
Create the Dockerfile
Armed with all this information, we will now be able to create the Dockerfile which contains the instructions for generating the Docker image of the application.
The first question to ask is to determine which base image we start from to initiate our environment. It seems relevant to use the Alpine Linux image for its lightness (only a little over 3 Mb in compressed format!) while providing the essential libraries to run an application.
Warning! The Alpine Docker image contains some limitations that may cause problems depending on your use case. Beyond the limited number of packages available, it is for example impossible to create users longer than 8 characters.
We can therefore propose the following Dockerfile:
# Parameters provided during build with a default value
ARG ALPINE_VERSION=3.20.0
# Base image used to generate ours
FROM alpine:${ALPINE_VERSION}

# Environment variables required by the application
ENV SITE_PORT=8080
ENV SITE_LANGUAGES="fr,en"
ENV MYWEBSITE_PATH="/srv/mywebsite"
ENV STATIC_ASSETS_PATH="${MYWEBSITE_PATH}/web/static"
ENV TEMPLATES_PATH="${MYWEBSITE_PATH}/web/template"
ENV DATA_PATH="${MYWEBSITE_PATH}/data"
ENV DATABASE_NAME="mywebsite.db"
ENV LOG_PATH="/var/log/mywebsite"
ENV CONFIG_PATH="/etc/mywebsite"

# Files/directories copied from host to image
ADD package.tgz /tmp
COPY deployments/docker/entrypoint.sh /
COPY deployments/docker/logrotate.d /tmp/logrotate.d/

# Image build commands
RUN \
    # Extracting and installing the application
    # We do not copy the package/data directory because it will be full
    # later by a bind mount with the website-data project package
    cd /tmp && \
    mkdir -p ${MYWEBSITE_PATH} && \
    mv package/web ${MYWEBSITE_PATH} && \
    mv package/bin/mywebsite /usr/local/bin/ && \
    # Create symbolic link ${STATIC_ASSETS_PATH}/images/articles
    # vers ${DATA_PATH}/articles/images
    ln -sf ${DATA_PATH}/articles/images ${STATIC_ASSETS_PATH}/images/articles && \
    # Give execution rights to the entrypoint.sh script
    chmod +x /entrypoint.sh && \
    # Create the application log directory
    mkdir -p ${LOG_PATH} && \
    # Install curl for healthcheck
    apk update && \
    apk --no-cache add curl && \
    # Configure the container timezone
    apk --no-cache add tzdata && \
    # Install and configure logrotate
    apk --no-cache add logrotate && \
    mkdir -p /etc/logrotate.d && \
    mv /tmp/logrotate.d/* /etc/logrotate.d/ && \
    logrotate -f /etc/logrotate.conf && \
    # Purge the installation directory
    rm -rf /tmp/*

# Expose the tcp port the application is listening on
EXPOSE ${SITE_PORT}

# Entrypoint script that will be executed when
# the container will be created
ENTRYPOINT ["/entrypoint.sh"]
Some remarks on the contents of the Dockerfile:
- the
ALPINE_VERSIONargument can be provided like this when building the image, otherwise it will be initialized to the value indicated in its declaration:docker build --build-arg ALPINE_VERSION=3.20.0 . ENVenvironment variables will also be available in the container, and can be overridden at launch with the docker run command- the
ADDcommand was chosen for thepackage.tgzarchive because it automatically extracts it into the target directory; otherwise it is recommended to use theCOPYcommand to make a copy. - the contents of the
RUNcommand must be indicated on a single line, hence the use of&& \at the end of each line of code in the Dockerfile - the application is launched by the
entrypoint.shscript in theENTRYPOINTdirective which specifies a command always executed at startup of the container. The same result could have been obtained with theCMDdirective which specifies arguments provided to theENTRYPOINT(which is/bin/sh -cby default).
Writing the Dockerfile should follow some good practices, the main one being to limit the number of
RUNcommands to the bare minimum in order to avoid creating too many layers to keep the image lightweight.
One point should be noted though: the user who will run the application inside the container will be root, and this can have security implications. That’s why we’ll see how to modify the Dockerfile so that the container is run with a different user.
In the case of our application, running the container with
rootis not a problem because we use Docker rootless which makes the Docker daemon run with a user without special rights on the host.
Dockerfile with non-root user:
ARG ALPINE_VERSION=3.20.0
FROM alpine:${ALPINE_VERSION}

# User and group id of the user who will run the application
ARG USER_ID=1000
ARG GROUP_ID=1000

COPY deployments/docker/logrotate.d /tmp/logrotate.d/

RUN \
    # Creation of the website user and assignment of its rights
    if [ ${USER_ID:-0} -ne 0 ] && [ ${GROUP_ID:-0} -ne 0 ]; then \
    addgroup -S -g $GROUP_ID website && adduser -S -s /bin/sh -u $USER_ID website -G website; else \
    addgroup -S website && adduser -S -s /bin/sh website -G website; fi && \
    mkdir -p /home/website/bin && chown -R website:website /home/website/bin && \
    # Install curl for healthcheck
    apk update && \
    apk --no-cache add curl && \
    # Configure the container timezone
    apk --no-cache add tzdata && \
    # Install and configure logrotate
    apk --no-cache add logrotate && \
    mkdir -p /etc/logrotate.d && \
    mv /tmp/logrotate.d/* /etc/logrotate.d/ && \
    logrotate -f /etc/logrotate.conf && \
    # Purge the installation directory
    rm -rf /tmp/*

# Change user to deploy the application
# and launch it in the container
USER website

# User environment variables website
ENV PATH="${PATH}:/home/website/bin"
ENV SITE_PORT=8080
ENV SITE_LANGUAGES="fr,en"
ENV WEBSITE_SRV_PATH="/home/website/srv"
ENV STATIC_ASSETS_PATH="${WEBSITE_SRV_PATH}/web/static"
ENV TEMPLATES_PATH="${WEBSITE_SRV_PATH}/web/template"
ENV DATA_PATH="${WEBSITE_SRV_PATH}/data"
ENV DATABASE_NAME="mywebsite.db"
ENV LOG_PATH="${WEBSITE_SRV_PATH}/log"
ENV CONFIG_PATH="${WEBSITE_SRV_PATH}/conf"

# Define the base directory in which will be
# executed the RUN commands
WORKDIR /home/website

# Copy specifying the rights assignment in the container
COPY --chown=website:website package.tgz /home/website
COPY --chown=website:website --chmod=755 deployments/docker/entrypoint.sh /home/website/bin

RUN \
    # Extracting and installing the application
    # We do not copy the package/data directory because it will be full
    # later by a bind mount with the website-data project package
    tar xzf package.tgz && \
    mkdir -p $WEBSITE_SRV_PATH && mv package/web $WEBSITE_SRV_PATH && \
    mv package/bin/mywebsite ~/bin/ && \
     # Create symbolic link ${STATIC_ASSETS_PATH}/images/articles
    # vers ${DATA_PATH}/articles/images
    ln -sf ${DATA_PATH}/articles/images ${STATIC_ASSETS_PATH}/images/articles && \
    # Create the application log directory
    mkdir -p ${LOG_PATH} && \
    # Purge the installation directory
    rm -rf package*

# Entrypoint script that will be executed when
# the container will be created
ENTRYPOINT ["entrypoint.sh"]
Some points to note;
ARG USER_ID/GROUP_ID=1000: we leave it to the user to determine the user/group id of the user that is created (with a default value of1000). It is indeed preferable that these values correspond to those of the user who will launch the container on the host, in particular for reasons of rights on bind mounts.- Environment variables have logically been transferred to the
websiteuser. COPY --chown=website:website --chmod=755 ...: copy commands must contain the rights assignment if they are to be returned to a user other than root, even after specifyingUSER website.
And there you have it! We are now able to test running our application in a container.
Define the entrypoint.sh script
We had defined it in our Dockerfile with the ENTRYPOINT command which executes it when the container is launched, we will now see the content of the entrypoint.sh script.
Its objective is to:
- run the application in the background
- retrieve standard and error output to a log file
- pass the application exit code to the container
#!/bin/sh
set -e

# Catch the SIGTERM signal and pass it to the child process
trap 'kill -TERM $PID' TERM

# Run the Go application in the background and get the PID
mywebsite 2>&1 | tee -a ${LOG_PATH}/mywebsite.log &
PID=$!
wait $PID

# Exit with the same execution code as the child process
exit $?
Test the build and execution of the Docker image
Build the Docker image and run the container
Generally speaking, it is best to place the Dockerfile at the root of the project it is to build, so that you have access to the files/folders it will need to copy into the container.
Indeed, it is impossible to indicate a path of type ../target or absolute such as /path/to/target in the COPY or ADD instructions of the Dockerfile.
Once we have placed the Dockerfile at the root of the project, we can launch the build of our application image:
$ docker build -t mywebsite .
-tindicates the name of the image with which it will be tagged (alatesttag will be assigned to it by default). Even if we don’t publish it yet, this will be useful to identify it in our Docker instance.defines the context of the build which is therefore the current directory.
We get an output similar to this:

If we use Docker Desktop, we can see the image in the list of those available in the Docker instance:
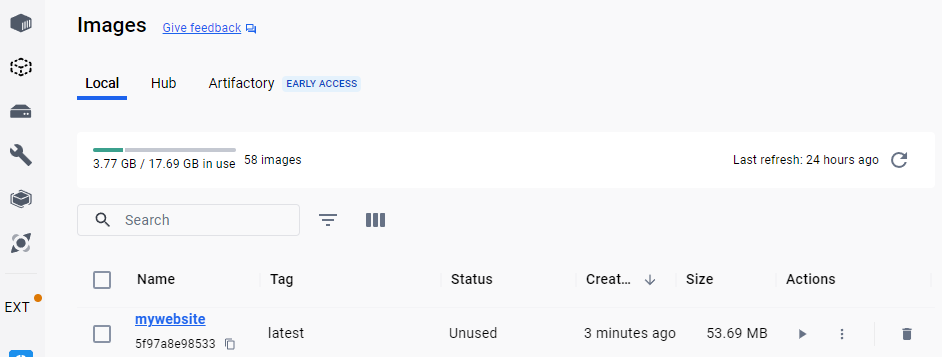
We can now launch the container with the docker run command:
$ docker run -d -p 8080:8080 --name mywebsite mywebsite:latest
-d: the container is executed in detached mode, this means that it runs in the background and that the terminal can be used-p 8080:8080: This option associates the host’s port 8080 with the container’s port 8080, which allows external access to the application running in the container--name mywebsite: we assign a name to the container so that we can identify it more easily, otherwise it receives a random name.mywebsite:latest: this is the name of the previously generated image and the tag assigned to it
The application can then be accessed by connecting to the URL http://localhost:8080 if Docker has been launched on the local machine.
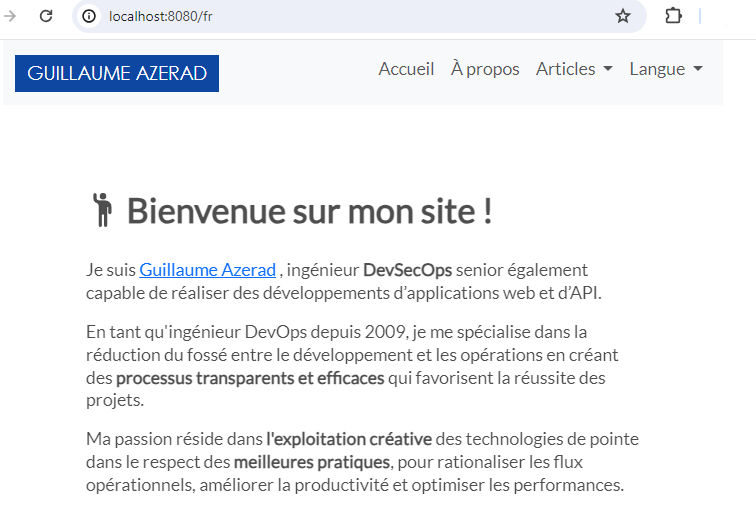
To stop the container and then delete it, you need to run the following two commands:
$ docker stop mywebsite
$ docker rm mywebsite
Create a complete test environment with Docker Compose
The sample repository of the Website Core project provides a test environment where the mywebsite application is executed behind an Nginx reverse proxy that serves it on the URL https://mywebsite.perso.com (provided that mywebsite.perso.com is associated with the corresponding server IP in its hosts file).
The corresponding docker-compose.yml file ensures the build of the mywebsite docker image from the context of the project root directory (defined relatively with ../../..) and the launch of the corresponding container behind the reverse proxy.
services:
  mywebsite:
    #image: mywebsite:latest
    build: ../../..
    container_name: mywebsite
    restart: always
    networks:
      - frontend
    expose:
      - "8080"
    volumes:
      - ./mywebsite/log:/var/log/mywebsite
      - ./mywebsite/data:/srv/mywebsite/data:rw

  reverse_proxy:
    image: nginx:1.26
    container_name: reverse_proxy
    restart: always
    networks:
      - frontend
    ports:
      - 80:80
      - 443:443
    volumes:
      - ./nginx/conf/nginx.conf:/etc/nginx/conf.d/default.conf
      - ./nginx/certs/mywebsite.crt:/etc/ssl/certs/mywebsite.crt
      - ./nginx/certs/mywebsite.key:/etc/ssl/private/mywebsite.key
      - ./nginx/log:/var/log/nginx

networks:
  frontend:
    driver: bridge
We note that we have introduced here the notion of volume:
    volumes:
      - ./mywebsite/log:/var/log/mywebsite
      - ./mywebsite/data:/srv/mywebsite/data:rw
Defined this way, by mounting a directory on the host with one inside the container, these are actually bind mounts, and they correspond to the directories identified in the Determine persistent data section.
We launch this environment by placing ourselves at the level of the docker-compose.yml file and executing the following command:
$ docker compose up -d
And we stop it like this:
$ docker compose down
Continuous Integration and Deployment with Gitlab CI
The purpose of this section is to define the jobs of a Gitlab CI/CD pipeline in order to perform the following tasks:
- generate the Docker image of the application and publish it on Docker Hub
- deploy the corresponding container on our environments where the application runs
Gitlab provides a container registry that allows you to publish Docker images for each project. However, we are not using it here since our image must be accessible outside the private network on which our Gitlab instance runs.
Building the Docker image and publishing it to Docker Hub
Here we consider that our Gitlab instance runs its jobs with a Docker runner, which is generally recommended.
The challenge here is to be able to run Docker commands (such as docker build or docker push) inside the container in which the job is running.
The first options offered are:
- Finally choose to run the job with a runner shell, which would require creating an additional runner.
- Use Docker-in-Docker (dind) but this requires privilege escalation for containers created by runners.
- Use socket binding to access the host’s Docker daemon inside containers.
Unfortunately, each of them introduces complexity, security issues and limitations; that’s why we’ll choose Kaniko to build our Docker images in Gitlab CI jobs.
Very simply (no special configuration of the Gitlab runner is required), the build/publish job of the Docker image is defined as follows in the .gitlab-in.yml file of the Website Core project:
publish-docker:
  stage: publish
  image:
    name: gcr.io/kaniko-project/executor:$KANIKO_VERSION
    entrypoint: [""]
  rules:
    - if: $DEPLOY_MODE == "Y"
      when: never
    - !reference [.rules, tag_release_candidate]
    - !reference [.rules, tag_release]
    - if: !reference [.rules, latest]
  script:
    - if [ X"$CI_COMMIT_TAG" == "X" ]; then IMAGE_TAG="latest"; else IMAGE_TAG=$CI_COMMIT_TAG; fi
    - echo "Info - the image will be pushed with '$IMAGE_TAG' tag"
    - |-
      echo "
      {
        \"auths\":{
          \"${DOCKERHUB_REGISTRY}\":{
            \"auth\":\"$(printf "%s:%s" "${DOCKERHUB_USER}" "${DOCKERHUB_PASSWORD}" | base64 | tr -d '\n')\"
          }
        }
      }" > /kaniko/.docker/config.json
    - /kaniko/executor
      --context "$CI_PROJECT_DIR"
      --build-arg ALPINE_VERSION=$ALPINE_VERSION
      --dockerfile "${CI_PROJECT_DIR}/Dockerfile"
      --destination "${DOCKERHUB_USER}/mywebsite:${IMAGE_TAG}"
You just need to define the following CI/CD variables, either in the .gitlab-ci.yml file or in the Gitlab UI (at the project/group/instance level):
DOCKERHUB_REGISTRY: the URL for publishing images on Docker Hub. Here you must specify the valuehttps://index.docker.io/v1/and not that of the repository on which the image will be published.DOCKERHUB_USER: the account name used to publish the image to Docker HubDOCKERHUB_PASSWORD: the corresponding password
These variables are therefore indicated in json format in the Kaniko configuration file /kaniko/.docker/config.json.
The image build command receives the following parameters here:
--context "\$CI_PROJECT_DIR": the context similar to that of thedocker buildcommand and which corresponds to the root of the project where the Dockerfile is located--build-arg ALPINE_VERSION=\$ALPINE_VERSION: the arguments that will enrich the variables defined by theARGkeyword in the Dockerfile.--dockerfile "\${CI_PROJECT_DIR}/Dockerfile": we precisely define the location of the Dockerfile here.--destination "\${DOCKERHUB_USER}/mywebsite:\${IMAGE_TAG}": the publication destination of the Docker image where the repository, the name of the image and its tag are indicated.
We then get the following output in the Gitlab pipeline log:
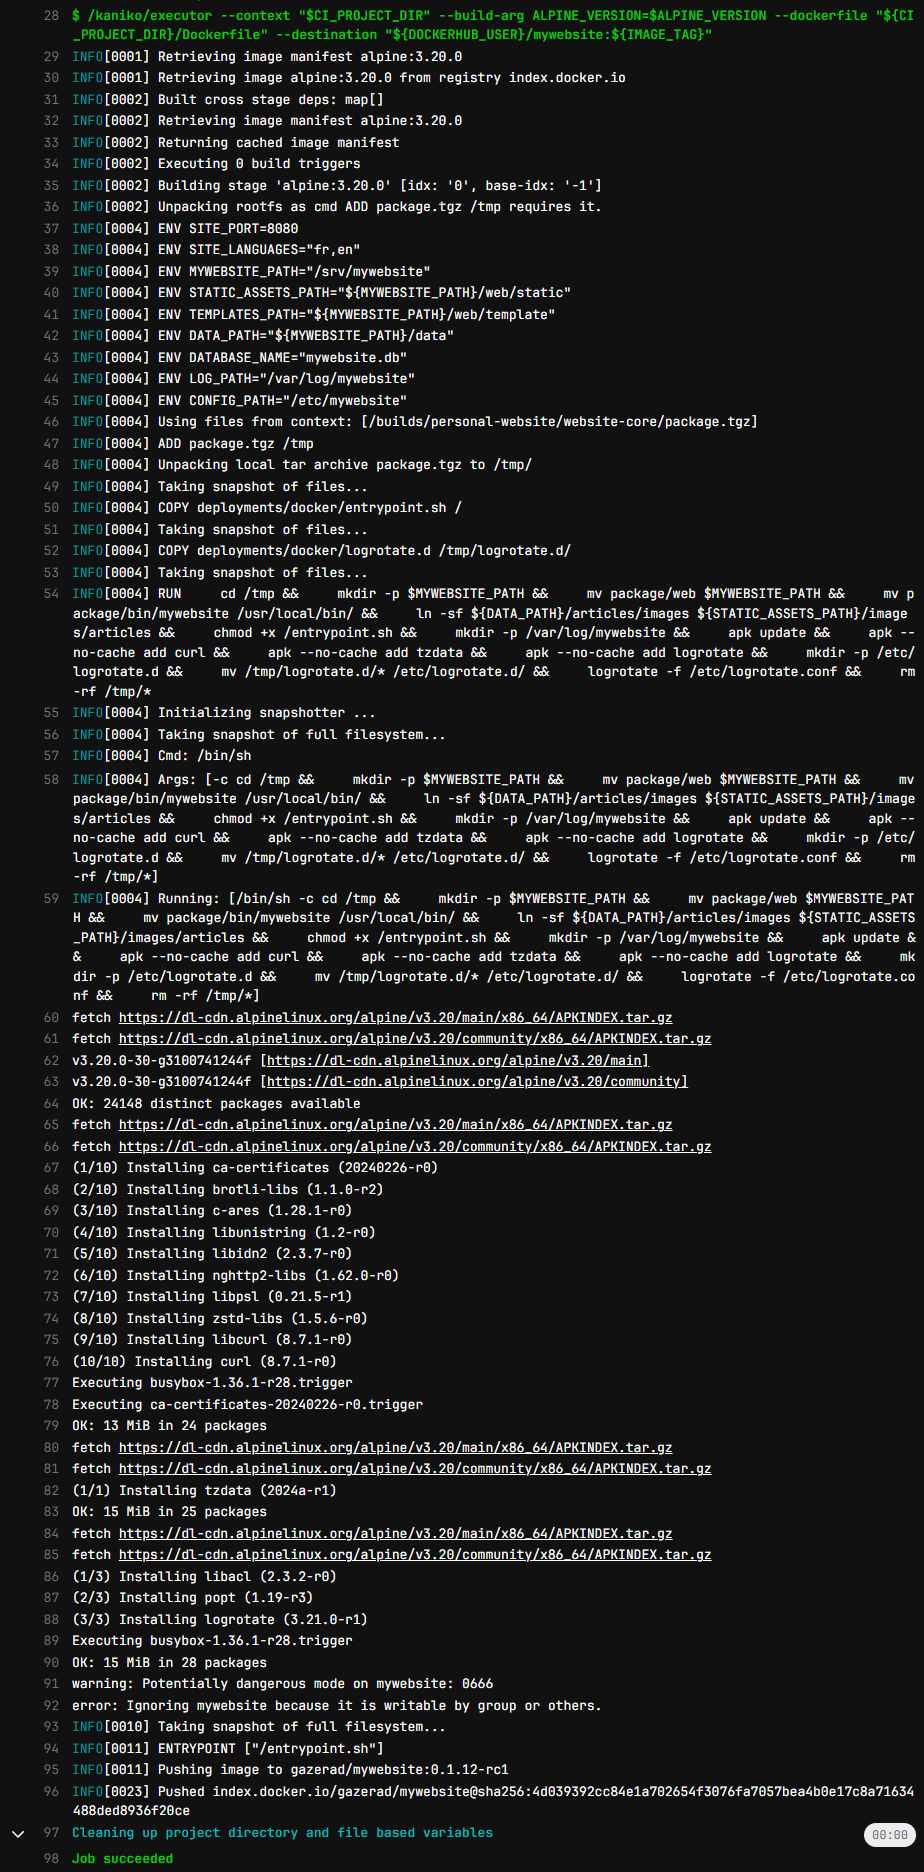
The Docker image is successfully generated and published in the gazerad/mywebsite repository on Docker Hub.
Deploying the application container
The application deployment, based on Gitlab CI/Ansible/Docker, is detailed in the article Continuous Deployment with Gitlab and Ansible.
In summary, we have a job in the CI/CD pipeline that will execute an Ansible playbook ensuring the deployment and launch of the application as well as the reverse proxy associated with it.
Here we will focus on the Ansible application role of the deployments defined in the Website Core project.
The tasks of the role consist first of all, after having correctly configured the environment, in deploying the Docker Compose file where the service that will execute the application is defined:
# roles/application/tasks/main.yml

- name: Deploy docker-compose file
  template:
    src: templates/docker-compose.yml.j2
    dest: "{{ application_dir }}/docker-compose.yml"
    mode: '600'
    owner: mywebsite
    group: mywebsite
The docker-compose.yml file is defined as a template containing variables enriched by the Ansible playbook:
# {{ ansible_managed | comment }}

services:
  mywebsite:
    # mywebsite_version variable is set from environment variable MYWEBSITE_VERSION
    image: gazerad/mywebsite:{{ mywebsite_version }}
    container_name: mywebsite
    restart: always
    networks:
      - frontend
    expose:
      - "8080"
    volumes:
      - "{{ mywebsite_dir }}/log:/var/log/mywebsite"
      - "{{ mywebsite_dir }}/data:/srv/mywebsite/data"
      - /etc/localtime:/etc/localtime:ro
    healthcheck:
      test: ["CMD", "curl", "-f", "http://localhost:8080/fr"]
      interval: 30s
      timeout: 10s
      retries: 3
    labels:
      autoheal: true

  autoheal:
  # To restart the unhealthy containers with label 'autoheal: true' defined
  # https://github.com/willfarrell/docker-autoheal
    image: willfarrell/autoheal:{{ versions.autoheal }}
    container_name: autoheal
    restart: always
    networks:
      - frontend
    volumes:
      # Still XDG_RUNTIME_DIR depends from the docker rootless user definition
      - "{{ xdg_runtime_dir }}/docker.sock:/var/run/docker.sock:ro"
      - /etc/localtime:/etc/localtime:ro
    environment:
      AUTOHEAL_INTERVAL: '30'
      AUTOHEAL_DEFAULT_STOP_TIMEOUT: '10'
      AUTOHEAL_CONTAINER_LABEL: 'autoheal'
      CURL_TIMEOUT: '10'
The autoheal service, optional in absolute terms, is intended to monitor the mywebsite service of the application and its restart under the conditions defined in its environment section.
Then, as we identified in analysis of the content to be deployed, the application role import tasks which allows to modify the bind mount containing the database and the articles by deploying the package of the Website Data project.
# roles/application/tasks/main.yml

- import_tasks: website_data.yml
  tags:
    - website-data
# roles/application/tasks/website_data.yml

- name: Set website data package version
  set_fact:
    website_data_pkg_ref: "{{ lookup('env', 'WEBSITE_DATA_PKG_REF') }}"
  become_user: mywebsite

- name: Download and extract website data package to target
  unarchive:
    src: "{{ external_gitlab_api_v4_url }}/projects/{{ external_website_data_id }}/packages/generic/data/{{ website_data_pkg_ref }}/data.tgz"
    dest: "{{ mywebsite_dir }}"
    remote_src: yes
  become_user: mywebsite
Finally, the handlers ensuring the restart of Docker Compose are called at the end of the tasks of the application role:
# roles/application/tasks/main.yml

- debug:
    msg: "Trigger docker compose stop"
  notify: Stop docker compose
  changed_when: true

- debug:
    msg: "Trigger docker compose start"
  notify: Start docker compose
  changed_when: true
