This article is part of a series on the scalability in a hybrid cloud with Azure :
Introduction
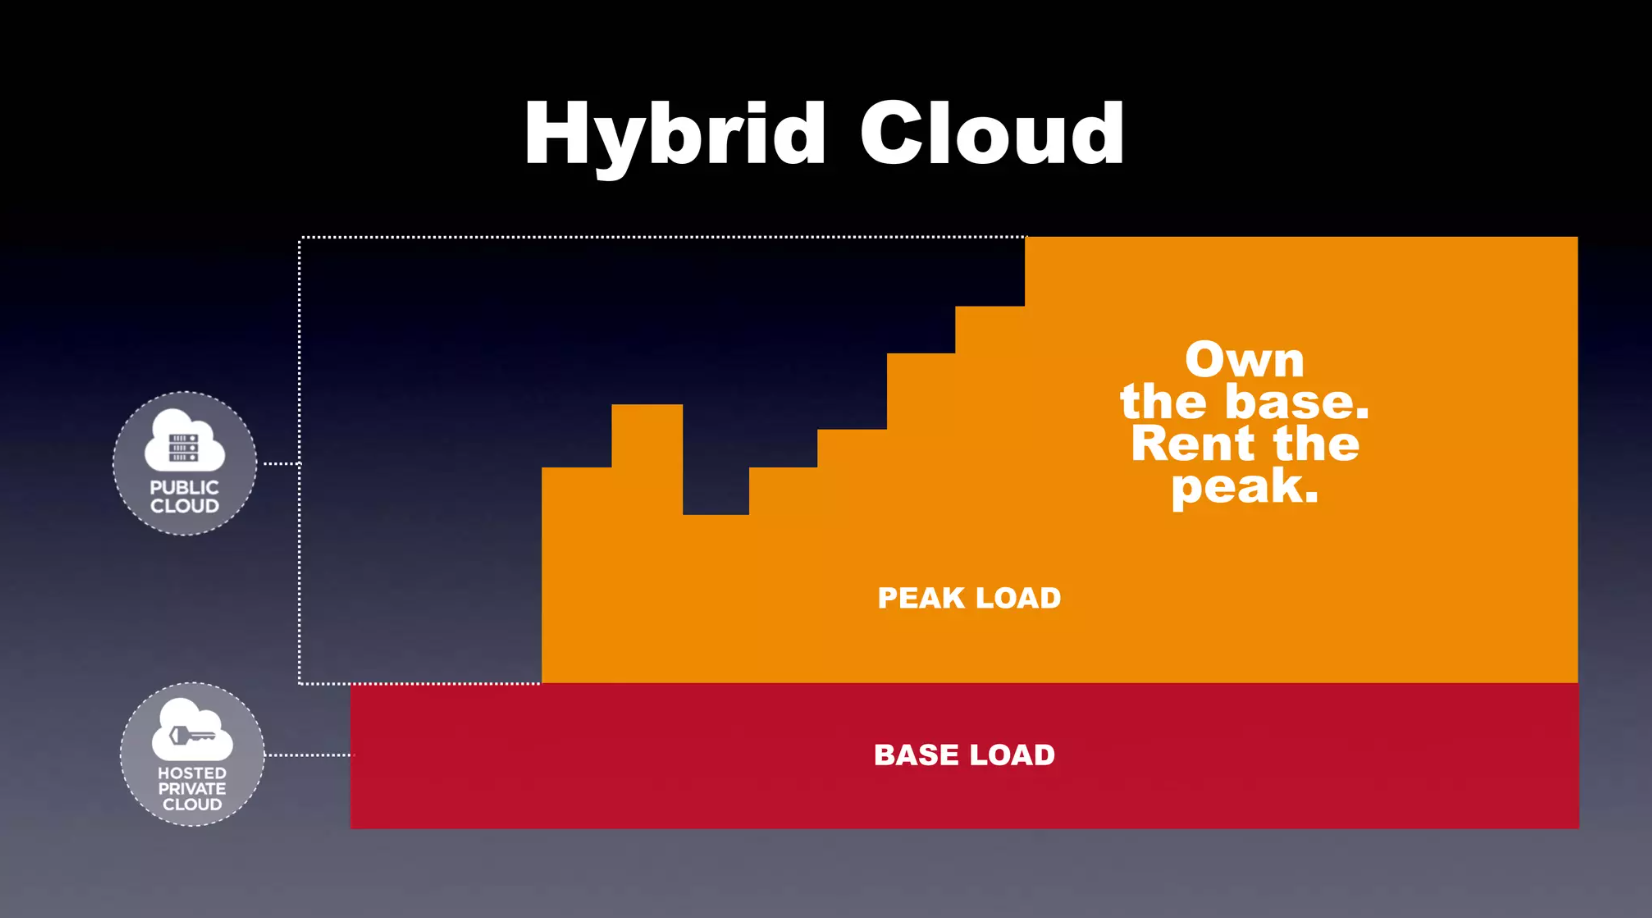
When deploying an application (e.g. web and public) on a private infrastructure, the question of scaling immediately arises: What will we do in the event of a peak load? Statically sizing our infrastructure to support the load poses an obvious cost problem, with unused/underused resources most of the time.
The public cloud offers the possibility to make resources available on demand, thus enabling elastic scaling of the infrastructure to adapt to the needs of the application.
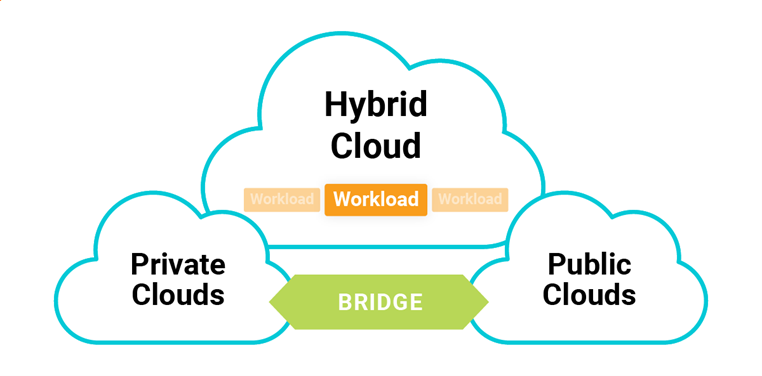
However, we may be reluctant to move the entire deployment of an application to a public cloud: for example, if the load peaks are very occasional, private infrastructure does the job very well most of the time and at possibly lower cost. This is where the concept of hybrid cloud comes in: interfacing an on-premise infrastructure with a public cloud infrastructure that is only activated during application activity peaks.
In this article, we will see how to detect activity peaks using monitoring, then trigger the creation of resources on the Azure cloud. associated with the on-premise infrastructure in the same VPN, with a distributed load thanks to a load balancer. For the first in the series, it is the creation of the hybrid cloud infrastructure that we will detail and the load distribution.
Use cases
Here we consider the case of a web application deployed on a VM on the local network. For our example, we will choose the very simple crccheck/hello-world application available on Docker Hub and which only displays one page at the root URL, configurable in this way with Docker Compose.
service:
  application:
    image: crccheck/hello-world
    container_name: application
    ports:
      - "80:8000"
Below is the initial local infrastructure:
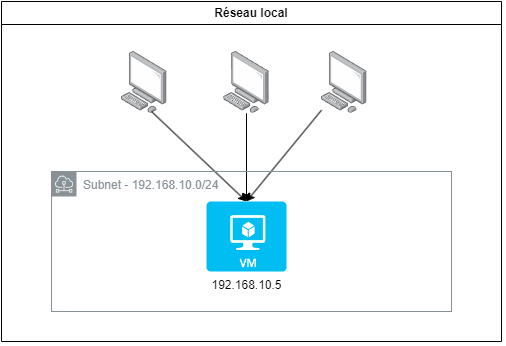
Users are in the private network since for convenience we have not exposed the application to the internet, but that could very well be the case.
The goal here is to create one to two VMs at most on the Azure cloud when a load peak is reached on the local VM, and to distribute the incoming connections between them. Conversely, when the load returns to “normal”, the resources created on Azure should be deleted and the connections redirected to the local VM only.
This way, we only use cloud resources when we need them, which is one of the advantages of implementing a hybrid cloud.
Regarding the load assessment on the local VM, we will consider CPU usage:
- CPU > 70% over the last 5 minutes => creation of Azure VM (up to two maximum)
- CPU < 30% over the last hour with presence of at least one peak > 70% (in 5 minute steps) => deletion of Azure VM
So we will see how to implement a solution allowing:
- connect the two networks (private and Azure)
- monitor local VM system metrics and detect CPU spikes
- scale by automatically creating/deleting resources on the Azure cloud
- distribute the load using a load balancer
In this article, we will describe the network architecture to meet these objectives, the hybrid Azure infrastructure associated with the initial network, and the load balancing between the two.
Network architecture
A first solution is to create an Azure virtual network with a public IP address which will serve as an internet gateway in order to be interconnected to the private network.
Traffic is distributed using two load balancers: one in the private network that routes to the on-premises VM or the internet gateway accessing Azure, the other in the Azure virtual network to distribute the load between the created VMs.
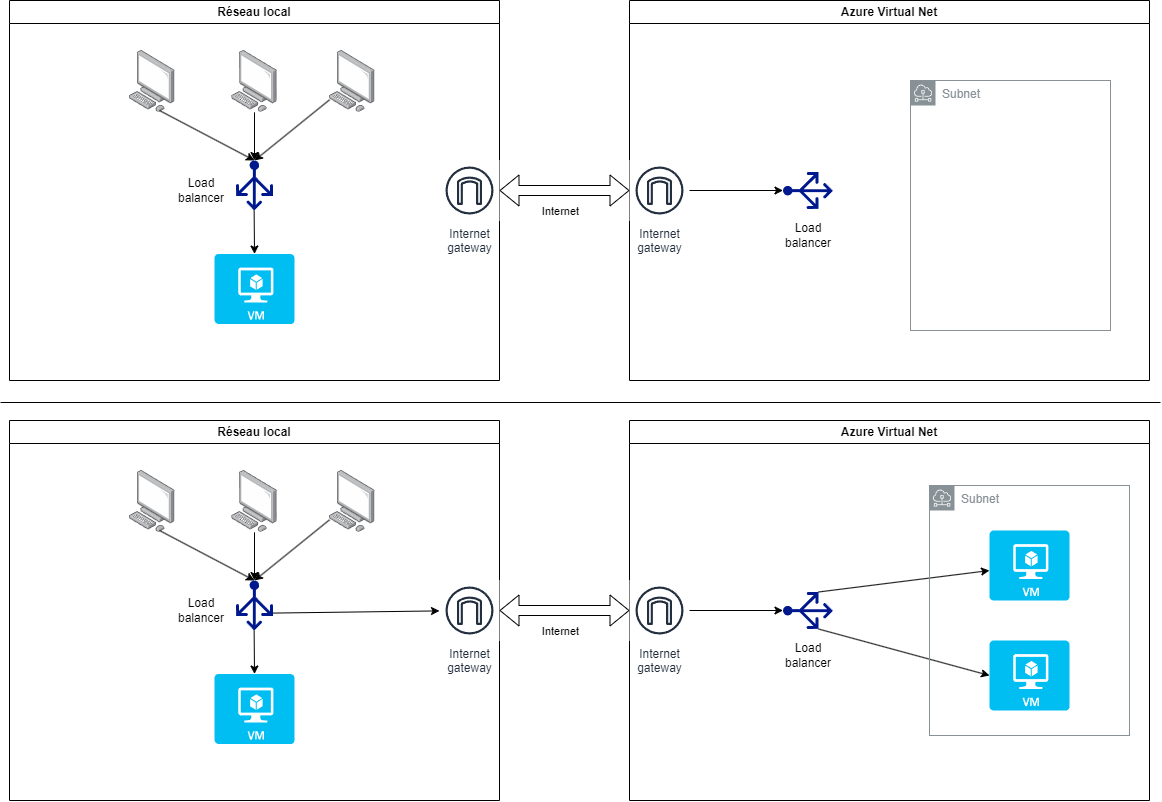
This proposal is quite functional but using an internet link can be problematic, especially because of the non-encryption of the transferred data. This is why it is preferable to set up a VPN link between the two sites: the data is encrypted (via a shared key), the two networks (private and cloud) are now united so it is possible to access the Azure VMs as if they were on the local network. You just have to be careful that the IP address ranges of the local network and the Azure network do not overlap.
Azure offers the ExpressRoute service to manage an optimized VPN link between an on-premises network and an Azure virtual private network. This of course comes at a cost: Metered Data for 200 Mbps bandwidth in Europe costs around $500 to $700 per month. Unlimited Data for 500 Mbps bandwidth in Europe costs around $2000 to $3000 per month.
Ideally, it would be relevant to set up a Site-to-Site (S2S) VPN connection if you wanted to deploy a hybrid cloud, so as to give yourself the possibility of administering your local VMs in the same way as Azure VMs thanks to Azure Arc.
We would then obtain the following architecture:
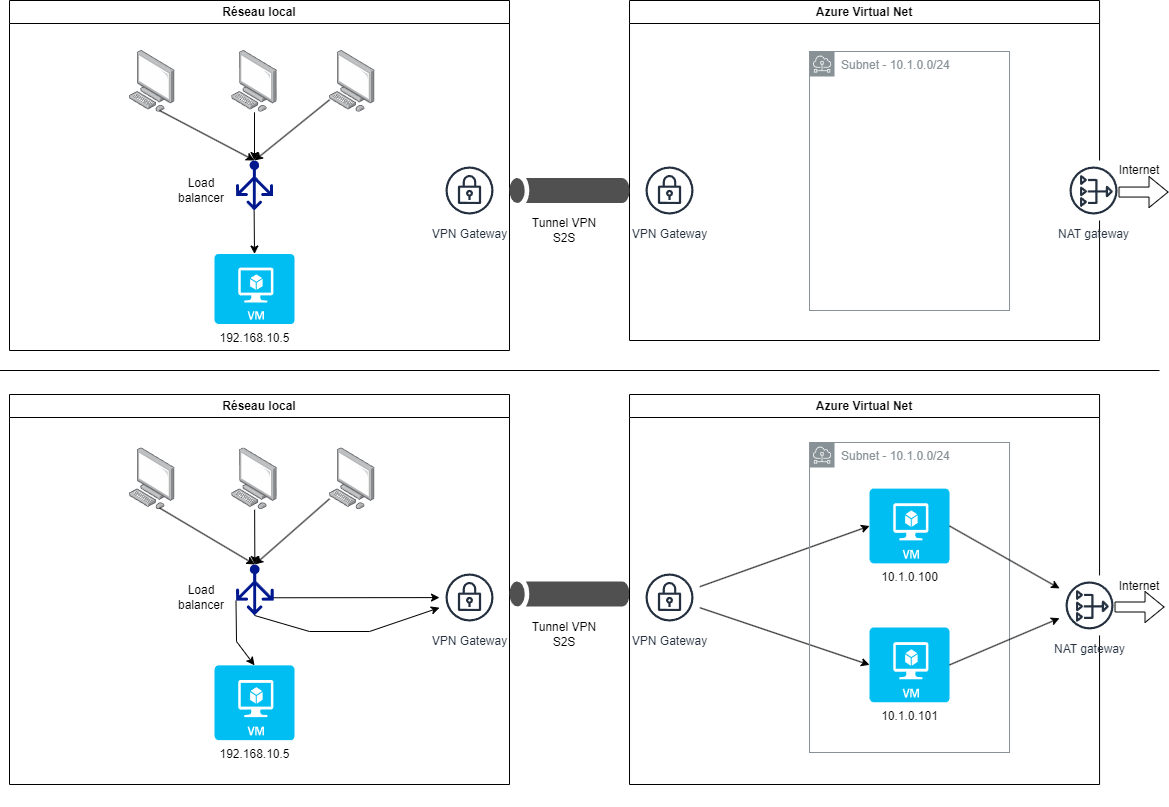
It can be noticed that, since the two networks have direct access to each other, there is only one load balancer needed.
This could also be moved into the Azure network, which would provide more flexibility since it would be possible to dynamically change its configuration when creating/deleting VMs.
The disadvantage in our case would be to perform a systematic round trip between the two networks to connect to the application when it is only deployed in the local network (most common case, outside peak load).
Additionally, the constraints of our test environment (my home network) make it impossible to create a VPN gateway exposing the private network with a public IP address.
This is why in the rest of the article, we will consider a Point-to-Site (P2S) VPN connection.

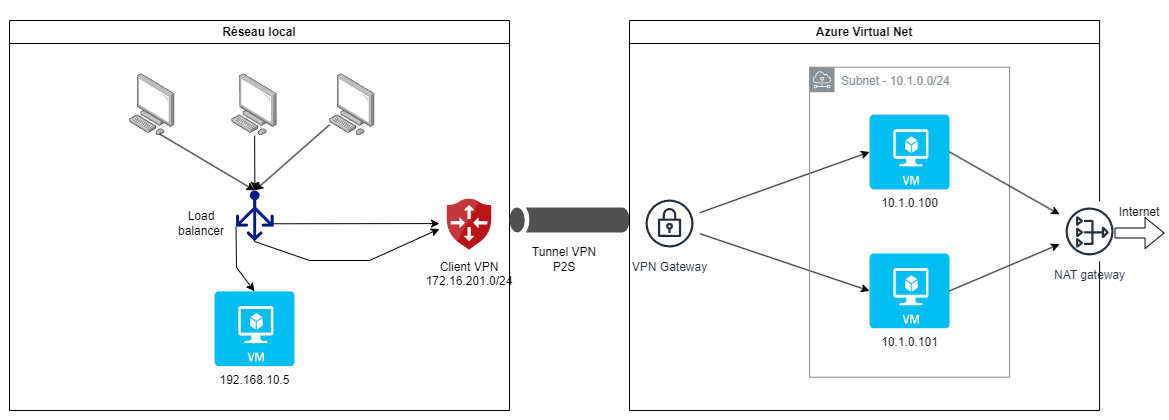
With this setup, it is not possible to move the load balancer within the Azure Virtual Network since it does not have knowledge of the local VM IP address to redirect traffic to it.
For the rest, the architecture is similar to the S2S case since the local load balancer will have direct access to the VMs created on Azure.
In both cases we notice the presence of a NAT gateway in the Azure network: this allows Azure VMs to access the internet while being in a strictly private subnet.
Building the Azure Cloud Infrastructure
Creating the cloud virtual network
As a reminder, here is the network infrastructure that we previously defined for our hybrid cloud:

The cloud part of the infrastructure therefore consists of an Azure Virtual Network which will be exposed with a public IP address to be able to connect it to our local network via a VPN link.
If this is not already done, you must Create an Azure account possibly linked to your Windows 365 account.
We also assume that Azure CLI is installed in order to run Azure Virtual Network administration commands.
We can now log in to our Azure account via the command line. There are several authentication methods that will be offered to us at the command line prompt.
az login
We assume that we are running the commands in a Linux environment (possibly WSL or Git Bash), and we define as we go the variables that we will use.
To make sure that we are connected to the subscription we want, we can list the subscriptions linked to our account and choose the appropriate one.
az account list --all

# Indicate your Azure subscription ID
SUBSCR_ID="xxxx-xxx-xxxx-xxxxxx-xxxxxxx" # your Azure subscription id
az account set --subscription "$SUBSCR_ID"
We will now create a resource group which
will allow you to associate all the elements related to our cloud infrastructure. We assign it the francecentral region here, but it is entirely possible to choose another one depending on the need as well as the costs and options offered (which may therefore differ from one region to another).
RESOURCE_GROUP="TpCloudHybrideVPN"
LOCATION="francecentral"

# Create a resource group for VPN
az group create --name $RESOURCE_GROUP --location $LOCATION
We can then create a virtual network that will host our entire cloud infrastructure. We need to associate an IP address range with it (here 10.1.0.0/16, i.e. all the IP addresses from 10.1.0.0 to 10.1.255.255) and we can already proceed to create the subnet “Frontend” that will host the VMs (10.1.0.0/24, i.e. an IP range from 10.1.0.4 to 10.1.0.254)
VNET_NAME="VnetVPN"
IPRANGE="10.1.0.0/16"
SUBNET_NAME="Frontend"
SUBNET="10.1.0.0/24"

# Create the virtual network with the desired IP range
az network vnet create --name $VNET_NAME --resource-group $RESOURCE_GROUP \
  --address-prefix $IPRANGE --location $LOCATION \
  --subnet-name $SUBNET_NAME --subnet-prefix $SUBNET
It can be noted that Azure reserves a total of 5 IP addresses per subnet: for example for the range
10.1.0.0/24, the address10.1.0.0is reserved for the network,10.1.0.1for the default gateway,10.1.0.2and10.1.0.3to map Azure DNS IP addresses to the virtual network space, and finally10.1.0.255for broadcast.
We now reserve a public IP address that we will later assign to the VPN gateway to associate the on-premises network and the Azure virtual network.
PUBLIC_IP="VnetVPNGwIp"

# Request a public IP for the Azure gateway
az network public-ip create --name $PUBLIC_IP --resource-group $RESOURCE_GROUP \
  --allocation-method Static --sku Standard
Setting up the P2S (point-to-site) VPN connection
Here we will create the VPN gateway, associate the previously created public IP address with it, and install the Azure VPN client to be able to establish the “point-to-site” connection from our local network.
First, we run the following CLI commands for creating the VPN gateway and its dedicated subnet.
You have to be careful here that the IP address range of the client VPN pool does not overlap with that of the virtual network dedicated to hosting the cloud infrastructure!
GATEWAY_SUBNET="10.1.255.0/27"
GATEWAY_SUBNET_NAME="GatewaySubnet"
GATEWAY_NAME="VnetVPNGwP2S"
VPN_CLIENT_IP_POOL="172.16.201.0/24"

# Create the Gateway subnet
az network vnet subnet create --address-prefix $GATEWAY_SUBNET \
  --name $GATEWAY_SUBNET_NAME --resource-group $RESOURCE_GROUP --vnet-name $VNET_NAME

# Create the VPN Gateway
az network vnet-gateway create --name $GATEWAY_NAME --public-ip-address $PUBLIC_IP \
  --resource-group $RESOURCE_GROUP --vnet $VNET_NAME \
  --gateway-type Vpn --vpn-type RouteBased --sku VpnGw2 --no-wait \
  --client-protocol IkeV2 OpenVPN \
  --vpn-gateway-generation Generation2 \
  --address-prefix $VPN_CLIENT_IP_POOL
In order to ensure the encryption of communications between the local network and the Azure virtual network, we will generate a root certificate which will be used to sign the client certificate used to establish the secure P2S VPN connection.
Depending on your configuration, it is possible to generate the root and client certificates with Powershell or Makecert on Windows, OpenSSL ou strongSwan pour Linux.
For our case, our local network is hosted on a Windows 11 PC using Windows Hyper-V so we used the Powershell instructions to generate the two certificates below.

So we can add the root certificate P2SRootCert.cer to the VPN gateway using Azure CLI again.
az network vnet-gateway root-cert create \
  --resource-group $RESOURCE_GROUP --gateway-name $GATEWAY_NAME \
  --name P2SRootCert --public-cert-data P2SRootCert.cer
Now we will go to the Azure portal, search for the name of our virtual network gateway VnetVPNGwP2S to access its page, and download vpn client configuration.

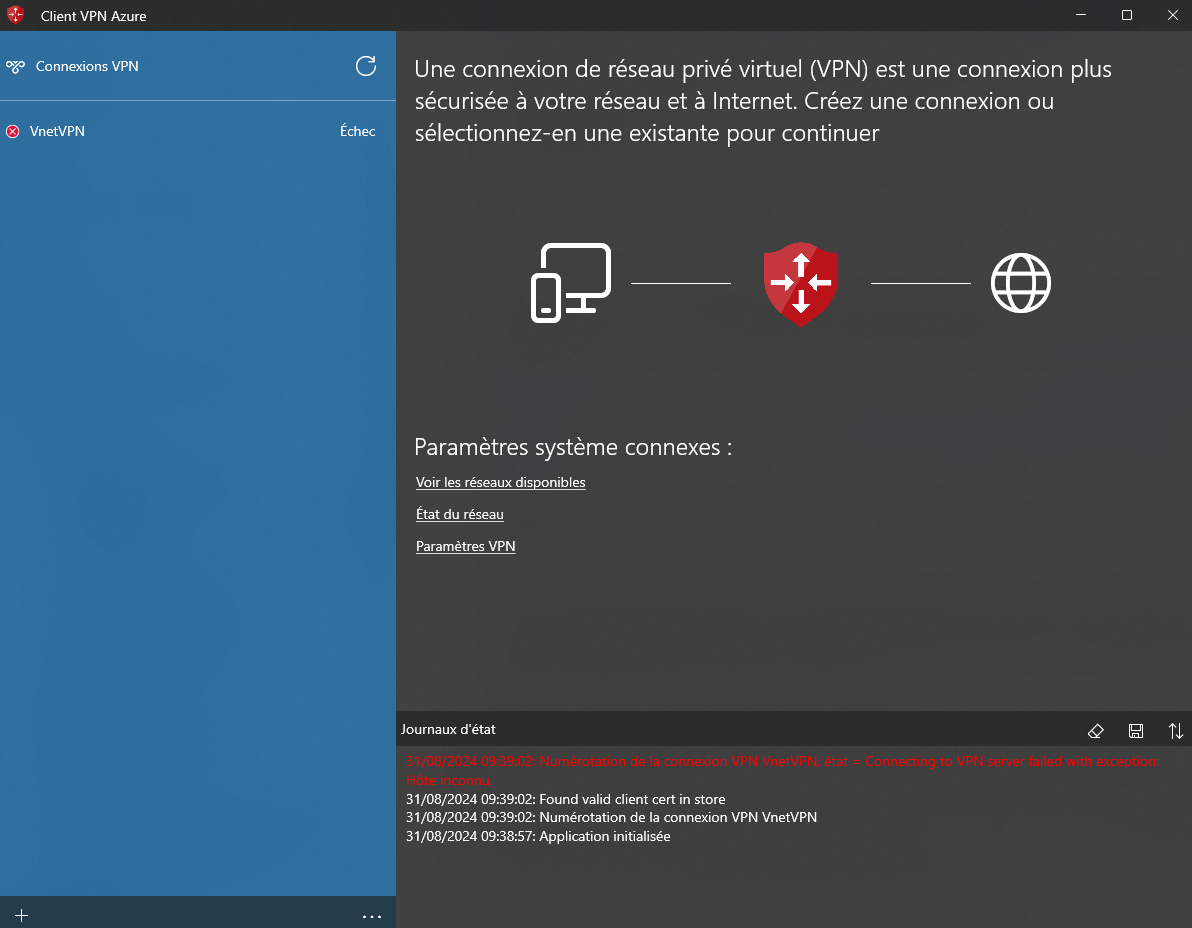
Finally, on our local network (here a Windows PC), we will install the Azure VPN client and the configuration from the zip file we just downloaded.
So we can see the VPN connection in the list and connect to it.
Creating an SSH bastion
In order to secure external access to VMs, a good practice is to create a bastion: this is a bounce server that will be the only one exposed to the internet via ssh. In this way, centralizing the entry point to a private network allows better control of external access to the infrastructure and isolation of a possible intrusion on the network.
Azure offers its own bastion service which offers multiple advantages including managing RDP connections; but for reasons of economy (we can get by with a minimally sized VM as a bastion) and learning the Azure infrastructure, we will create a subnet and a VM dedicated to the bastion.
Regarding costs, a standard Linux VM (2 vCPU, 8 GB RAM) will cost around $35/month where the costs of an Azure Bastion instance will amount to almost $140/month without even taking into account the pricing of the transferred data.
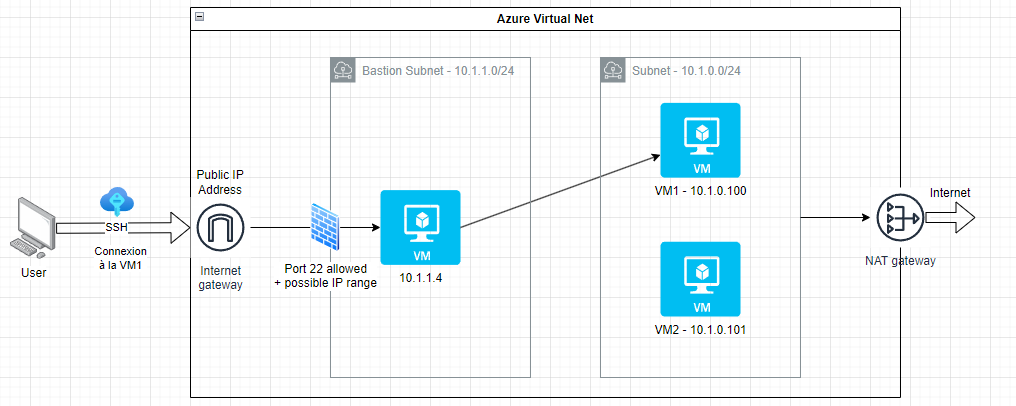
We can see in the previous diagram that we are applying rules on incoming traffic through a network security group to only allow traffic on port 22 (and possibly from a range of allowed IP addresses).
Now here are the Azure CLI commands to create the SSH bastion; we can notice that in our case, we do not expose the bastion to the internet since we only connect to it via VPN link. The commands related to public access are therefore commented.
BASTION_SUBNET_NAME="Bastion"
BASTION_SUBNET_RANGE="10.1.1.0/24"

# No need here to create a public IP address as we are using VPN
# az network public-ip create --resource-group "$RESOURCE_GROUP" \
#   --name BastionPublicIP --sku Standard --zone 1 2 3

# Create the dedicated subnet
az network vnet subnet create \
  --name $BASTION_SUBNET_NAME \
  --resource-group $RESOURCE_GROUP \
  --vnet-name $VNET_NAME \
  --address-prefixes "$BASTION_SUBNET_RANGE"

# Create a Network Security Group
az network nsg create --resource-group "$RESOURCE_GROUP" --name BastionNSG

# Create a network security group rule that only allows
# incoming traffic on port 22 (ssh)
az network nsg rule create \
  --resource-group "$RESOURCE_GROUP" --nsg-name BastionNSG --name BastionNSGRuleSSH \
  --protocol 'tcp' --direction inbound \
  --source-address-prefix '*' --source-port-range '*' \
  --destination-address-prefix '*' --destination-port-range 22 \
  --access allow --priority 200

# We could limit the source IP range (not necessary here because bastion without public IP)
# --source-address-prefix $VPN_CLIENT_IP_POOL

# Create the SSH Bastion VM
az vm create \
  --resource-group "$RESOURCE_GROUP" \
  --name "BastionSSHVM" \
  --image "Debian:debian-12:12:latest" \
  --size "Standard_B1s" \
  --location "$LOCATION" \
  --vnet-name "$VNET_NAME" \
  --subnet "$BASTION_SUBNET_NAME" \
  --public-ip-address "" \
  --nsg "BastionNSG" \
  --admin-username "azureuser" \
  --ssh-key-value ~/.ssh/id_ed25519_azure_bastion.pub \
  --output json \
  --verbose
  # --public-ip-address "BastionPublicIP" \
Azure VM Subnet Configuration
After creating the bastion, we will now be able to define access rules to the subnet hosting the VMs as well as their outgoing internet access via a NAT gateway.
######################################
# Configuring the VM Subnet

FRONTEND_NSG_NAME="FrontendNSG"

# Create a Network Security Group
az network nsg create --resource-group "$RESOURCE_GROUP" --name $FRONTEND_NSG_NAME

# Create a network security group rule that does not allow
# incoming traffic on port 22 (ssh) as well as from
# from the SSH Bastion subnet
az network nsg rule create \
  --resource-group "$RESOURCE_GROUP" --nsg-name $FRONTEND_NSG_NAME --name AllowSSHFromBastion \
  --protocol Tcp  --direction inbound \
  --source-address-prefix $BASTION_SUBNET_RANGE --source-port-range '*' \
  --destination-address-prefix '*' --destination-port-range 22 \
  --access allow --priority 100 \
  --description "Allow SSH from Bastion subnet"

az network nsg rule create \
  --resource-group $RESOURCE_GROUP --nsg-name $FRONTEND_NSG_NAME --name DenySSHFromOthers \
  --priority 200 --source-address-prefixes '*' --destination-port-ranges 22 \
  --direction Inbound --access Deny --protocol Tcp \
  --description "Deny SSH from all other sources"

# Associate the NSG to the Frontend subnet
az network vnet subnet update \
  --vnet-name $VNET_NAME --name $SUBNET_NAME --resource-group $RESOURCE_GROUP --network-security-group $FRONTEND_NSG_NAME

######################
# NAT Gateway

# Create a public IP address
az network public-ip create --resource-group "$RESOURCE_GROUP" \
  --name NATPublicIP --sku Standard --zone 1 2 3

# Creating the NAT Gateway
az network nat gateway create \
    --resource-group $RESOURCE_GROUP \
    --name NATGateway \
    --public-ip-addresses NATPublicIP \
    --idle-timeout 10 \
    --location $LOCATION

# Configure NAT service for subnet $SUBNET_NAME
az network vnet subnet update \
    --name $SUBNET_NAME \
    --resource-group $RESOURCE_GROUP \
    --vnet-name $VNET_NAME \
    --nat-gateway NATGateway
Please note: the Azure NAT Gateway service is chargeable from the moment it is initialized
Viewing resources on the Azure portal
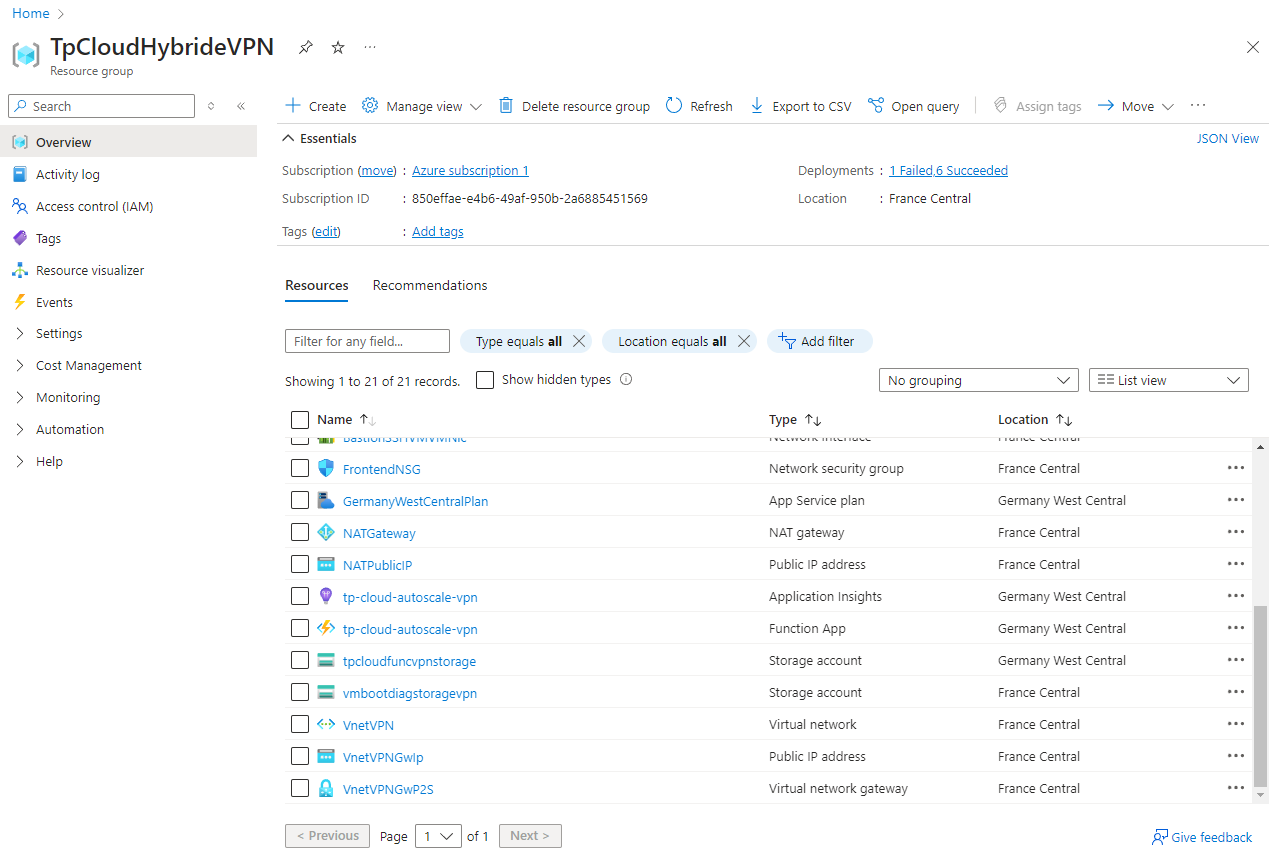
All created resources are visible in the TPCloudHybrideVPN resource group that we created at the very beginning:
Load balancing between on-premises network and Azure cloud
Description of the need
As a reminder, the objective of the hybrid cloud is to create one to two VMs on the Azure infrastructure in the event of a load peak, and we proposed the following network diagram with a load balancer in the local network.
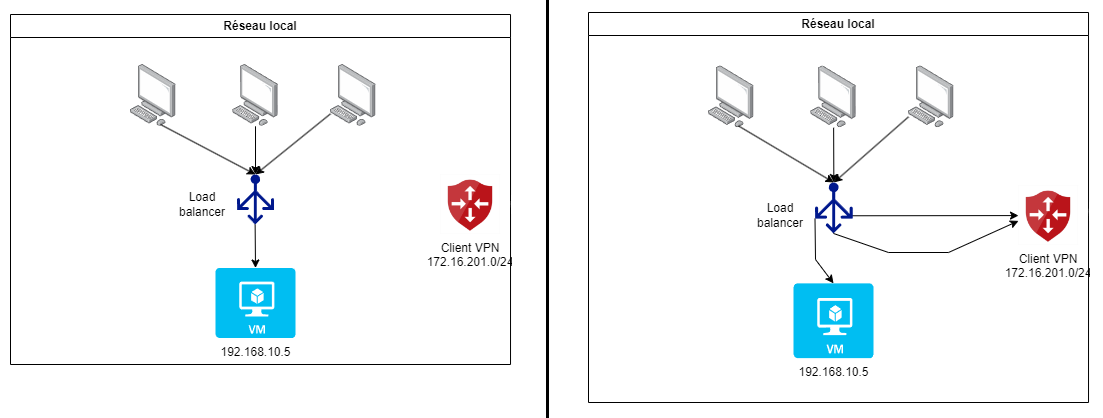
We could have chosen to place the load balancer in the Azure cloud network, especially since Azure Load Balancer offers the possibility to dynamically add/remove target servers, which perfectly suited our needs.
However, with the VPN point-to-site network architecture that we had to choose, it is not possible for a load balancer located in the Azure network to reach a VM on the local network. Furthermore, it would not necessarily have been relevant to force each connection to the application to go through the remote Azure network if, for the most part, it was only deployed on the local VM.
The challenge here is for the local load balancer to dynamically take into account the VMs created on the Azure cloud in the event of a load peak. We assume that the VMs will always have the same IP address (10.1.0.100 and 10.1.0.101).
Nginx load balancer with passive health check
A first solution is to have the load balancer temporarily deactivate the route to one of the servers if the requests sent to it fail.
For this we can use the passive health check functionality offered in the free version of Nginx.
In this case, the following two parameters must be provided in the load balancer’s target server configuration:
fail_timeout: Sets the time within which a certain number of failed attempts must occur for the server to be marked as unavailable, as well as its downtime periodmax_fails: Sets the number of failed attempts that must occur during thefail_timeoutperiod for the server to be marked as unavailable
In order to impact users as little as possible with web page display errors when a request is sent to an unavailable server, we will limit the max_fails parameter to a single attempt and define a sufficiently long unavailability period (5 minutes for example).
To do this, simply create the following configuration file (which we will call load_balancer.conf), then mount it as a volume of the Nginx container defined in Docker Compose. This also contains the SSL definition with a certificate and the http to https redirection.
load_balancer.conf
upstream myapp {
    # Main application server in the local network
    server 192.168.10.5;
    # VMs created on Azure during peak load
    server 10.1.0.100 max_fails=1 fail_timeout=120s;
    server 10.1.0.101 max_fails=1 fail_timeout=120s;
}

server {
  listen 80;
  listen [::]:80;
  server_name myapp.perso.com;
  return 301 https://$server_name$request_uri;
}

server {
    listen 443 ssl;
    listen [::]:443 ssl;

    client_max_body_size 100M;
    client_body_in_file_only on;

    server_name myapp.perso.com;

    ssl_certificate /etc/ssl/certs/myapp.crt;
    ssl_certificate_key /etc/ssl/private/myapp.key;

    access_log /var/log/nginx/myapp.access.log;
    error_log /var/log/nginx/myapp.error.log debug;

    location / {
        proxy_pass http://myapp;
    }
}
docker-compose.yml
services:
  load_balancer:
    image: nginx:1.27.0
    container_name: load_balancer
    ports:
      - "80:80"
      - "443:443"
    networks:
      - frontend
    volumes:
      - ./nginx/conf.d/load_balancer.conf:/etc/nginx/conf.d/load_balancer.conf:ro
      - ./certs/perso.com.crt:/etc/ssl/certs/myapp.crt:ro
      - ./certs/perso.com.key:/etc/ssl/private/myapp.key:ro
      - ./nginx/log:/var/log/nginx
      - /etc/localtime:/etc/localtime:ro
This way, as long as both Azure VMs are not active, they are removed as targets from the load balancer for a period of 5 minutes at the first unsuccessful connection attempt.
This behavior is not really satisfactory however since some users will get an error page when redirected to non-existing Azure VMs until the load balancer disables the corresponding route.
This is why we are going to see how to implement an active health check with Trafik.
Nginx also offers an active health check in its paid version Nginx Plus.
Active health check with Traefik load balancer
The active health check this time consists of the load balancer initiating connection attempts to its target servers itself in order to determine whether or not to deactivate them.
This way, the user is no longer impacted by the loss of one of the servers since his connection will always be redirected to one of the active servers (as long as there is at least one, of course).
Traefik offers such a solution in its free version.
Note however that unlike Nginx which offers multiple load distribution strategies, Traefik only provides round robin.
The Traefik load balancer provides the ability to configure only in Docker Compose when traffic is redirected to other containers in the same Docker instance, notably using labels to identify containers.
In our case, the load balancer targets remote servers so we will use a dynamic configuration with the following file as provider.
dynamic_config.yaml
http:
  routers:
    my-router:
      rule: "Host(`myapp.perso.com`)"
      service: my-service
      entryPoints:
        - web

    my-router-https:
      rule: "Host(`myapp.perso.com`)"
      service: my-service
      entryPoints:
        - websecure
      tls: {}

  services:
    my-service:
      loadBalancer:
        servers:
          - url: "http://192.168.10.5"
          - url: "http://10.1.0.100"
          - url: "http://10.1.0.101"
        healthCheck:
          path: "/"
          interval: "10s"
          timeout: "3s"

tls:
  certificates:
    - certFile: "/etc/ssl/certs/perso.com.crt"
      keyFile: "/etc/ssl/private/perso.com.key"
We can notice that:
- the configuration provides two routes for http and https from the hostname
myapp.perso.comwhich direct the flow to the respective entry pointswebandwebsecure. We will then see how to perform the http -> https redirection. - the SSL and certificates part is defined in this file
- the load balancer is defined in the
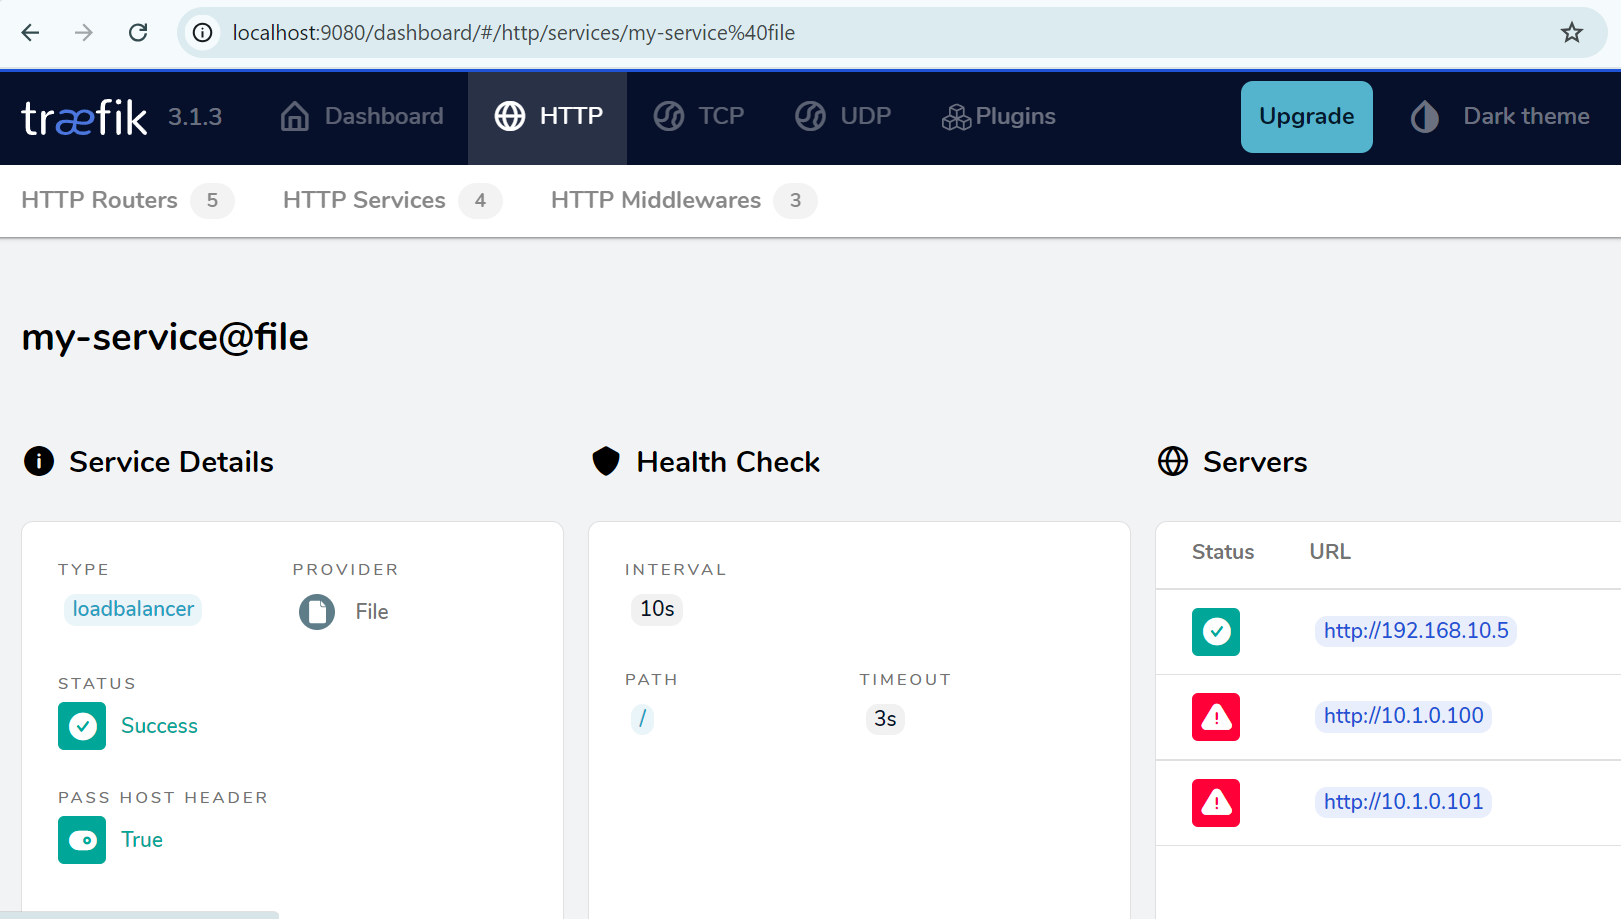
servicessection with the 3 target servers and especially the details of the health check where we indicate the test interval, the timeout and the path tested in the URL
Now, we will detail the corresponding Docker Compose service.
docker-compose.yml
services:
  load_balancer:
    image: traefik:v3.1
    container_name: load_balancer
    ports:
      - "8000:80"
      - "4443:443"
      - "9080:8080"
    networks:
      - frontend
    command:
      - --entrypoints.web.address=:80
      - --entrypoints.web.http.redirections.entrypoint.to=:4443
      - --entrypoints.web.http.redirections.entrypoint.scheme=https
      - --entrypoints.websecure.address=:443
      - --providers.file.filename=/etc/traefik/dynamic_config.yaml
      - --api.insecure=true
    volumes:
      - ./traefik/dynamic_config.yaml:/etc/traefik/dynamic_config.yaml
      - ./certs/perso.com.crt:/etc/ssl/certs/perso.com.crt
      - ./certs/perso.com.key:/etc/ssl/private/perso.com.key
Some remarks:
- ports: in our case, we expose different ports than 80 and 443 for http and https in order not to interfere with other applications. This requires us to explicitly specify the https port to which the redirection is made (4443 here), otherwise the command parameter
--entrypoints.web.http.redirections.entrypoint.to=:4443would not be necessary. - entry points for http and https are defined
- the provider is correctly indicated as being the previously defined
dynamic_config.yamlfile - we expose the Traefik dashboard on the external port 9080 without https (therefore with the parameter
--api.insecure=true) - dynamic certificates and configuration file are mounted as volumes
Once the Docker Compose environment is started with the command docker compose up -d, we can see the application page at the address https://myapp.perso.com:4443 (with a redirection to this URL if we indicate http://myapp.perso.com:8000).
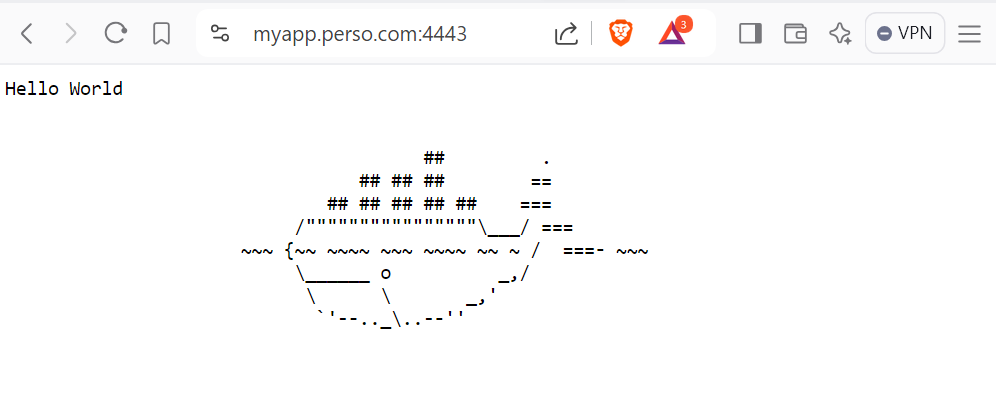
And this time, we have no errors even if only one of the 3 servers works as in our case where the Azure VMs are not enabled. The Traefik dashboard allows us to see that the load balancer has correctly removed the Azure VMs from its configuration.
