This article is part of a series on the scalability in a hybrid cloud with Azure :
Introduction
In the first article, we described the hybrid cloud infrastructure intended to ensure the scaling of an application initially deployed on a VM on a local network.
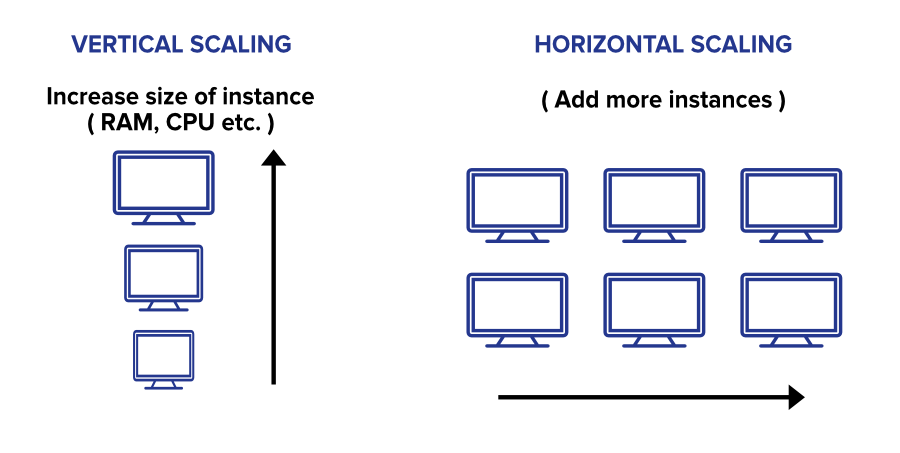
We are now addressing the implementation of this scaling (or scalability) which will therefore be horizontal, that is to say which will be done by adding new instances in order to ensure the same task.
The challenge detailed in this article is to provide a simple and automated way to adapt the infrastructure by extending it on the Azure public cloud in order to respond to load peaks on the initial local infrastructure.
Creating the scaling mechanism on Azure
Solution overview
Let’s recall the goal of autoscaling our application: create one to two VMs at most on the Azure cloud when a load peak is reached on the local VM, and distribute the incoming connections between them. Then, when the load returns to “normal”, the resources created on Azure must be deleted and the connections redirected to the local VM only.
Azure Functions is a serverless cloud service that allows you to immediately set up an API exposing an application whose code you have deployed. In short, it is a direct way to run code through an API, without worrying about the underlying infrastructure, with the added benefit of access to the private cloud network you have created.
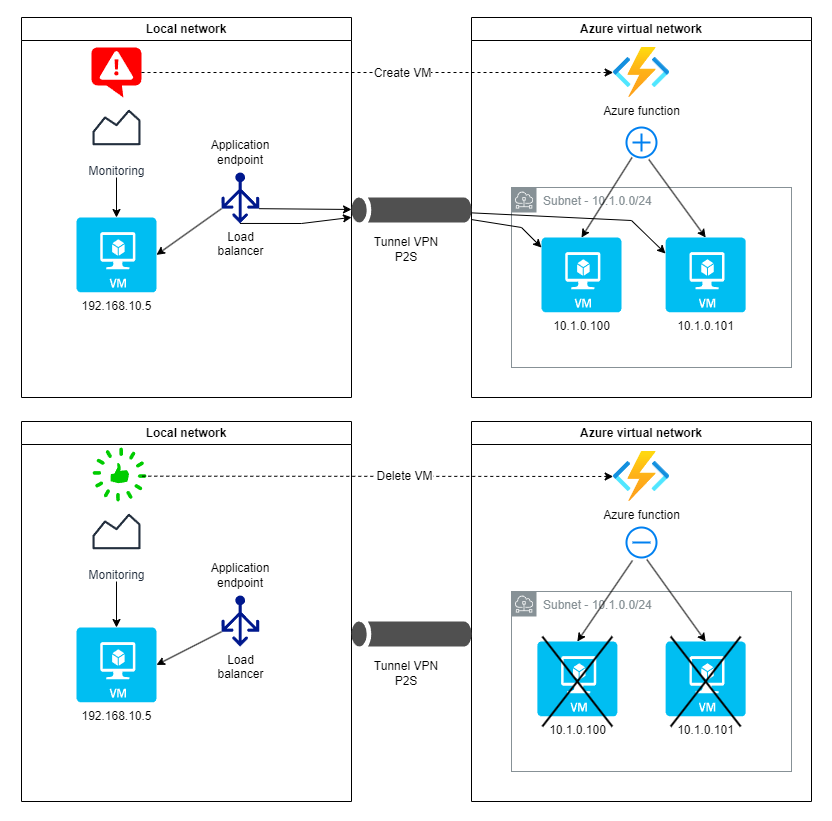
As we will see in the next article, the monitoring stack uses Alertmanager which is configured to call a URL when alerts are generated by Prometheus. The Azure function will therefore allow us to ensure the automatic scaling chain of the cloud infrastructure in response to monitoring alerts since it will offer an API to create/delete Azure VMs to which the Alertmanager webhooks will point.
Explanation of the choice of Azure Functions
Azure offers automatically managed scaling tools that could have met our needs, and more specifically Virtual Machine Scale Set (VMSS). This feature allows you to define a group of VMs equipped with a load balancer whose number of units can be varied based on monitoring events.
In a very simple way as detailed in this tutorial, we can define a minimum and maximum number of VMs specific to the group as well as monitoring parameters generating the creation or deletion of VMs.
So we are apparently in our use case except that we want to monitor only the VM of the local network. In the absence of an Azure Arc configuration that allows to manage an on-premises VM and an Azure VM identically, it is impossible to define a VMSS including the main VM for which monitoring events would trigger horizontal scaling on Azure.
Furthermore, Azure Functions has some advantages that match our needs:
- Out-of-the-box API: Azure Functions allows to create a triggerable API (via HTTP, webhook, etc.) without having to develop and host our own API.
- Event-based automation: An Azure Function can automatically respond to events (like load alerts) and perform necessary actions (VM creation/deletion) without manual interaction.
- Automatic scalability: by its serverless nature, Azure Functions adapts to the load without having to manage infrastructure, unlike a CLI script which would require a server.
- Pay-as-you-go billing: you only pay for the execution time, which is more cost-effective than keeping a CLI process running all the time.
- Simplified integration: An Azure function easily integrates with other Azure services (monitoring, Event Grid, etc.) to create more complex and robust workflows.
Since our application is containerized, it would have been relevant to use the Azure Container Instances service, a serverless solution that allows scaling by creating container instances. For educational purposes, we choose to stick to scalability by VM.
Creating Azure resources
We will now take care of creating the Azure resources that will allow us to ensure the scalability on the cloud of our application.
First we need to define the VM specific configuration which is characterized by the following elements:
- a rule allowing HTTP traffic (port 80) for the web application deployed on the VMs
- a storage account for the VM startup diagnostic output
RESOURCE_GROUP="TpCloudHybrideVPN"
LOCATION="francecentral"
VM_BOOT_STORAGE_ACCOUNT="vmbootdiagstoragevpn"

# Create a network security group
az network nsg create --resource-group $RESOURCE_GROUP --name myNSG

# Create a network security group rule
az network nsg rule create \
  --resource-group $RESOURCE_GROUP --nsg-name myNSG --name myNSGRuleHTTP \
  --protocol '*' --direction inbound \
  --source-address-prefix '*' --source-port-range '*' \
  --destination-address-prefix '*' --destination-port-range 80 \
  --access allow --priority 200

# Create a storage account for the boot diagnostic output
az storage account create --name $VM_BOOT_STORAGE_ACCOUNT \
  --location $LOCATION --resource-group $RESOURCE_GROUP\
  --sku Standard_LRS # --allow-blob-public-access false
We will also create the Azure Function and the following resources associated with it:
- another storage account
- a blob storage container to provide the initialization script for the VMs deploying the
init.shapplication, the content of which we will detail in the next section.
We notice in the CLI commands that the function is hosted in the germanywestcentral region since the francecentral region did not offer such functionality (at the time the lab was carried out).
FUNCTION_LOCATION="germanywestcentral"
FUNCTION_NAME="tp-cloud-autoscale-vpn"
FUNCTION_STORAGE_ACCOUNT="tpcloudfuncvpnstorage"

# Create storage account for Azure function
az storage account create --name $FUNCTION_STORAGE_ACCOUNT \
  --location $FUNCTION_LOCATION --resource-group $RESOURCE_GROUP\
  --sku Standard_LRS # --allow-blob-public-access false

# Create the function (in the germanywestcentral region because not possible in $LOCATION)
az functionapp create --resource-group $RESOURCE_GROUP \
  --consumption-plan-location $FUNCTION_LOCATION --runtime powershell \
  --functions-version 4 --name $FUNCTION_NAME --storage-account $FUNCTION_STORAGE_ACCOUNT

# Create a storage container for the VM init script
az storage container create \
    --account-name $FUNCTION_STORAGE_ACCOUNT \
    --name init-script-vm

# Add the init.sh file that we assume is present here
az storage blob upload \
    --account-name $FUNCTION_STORAGE_ACCOUNT \
    --container-name init-script-vm \
    --name init.sh \
    --file init.sh
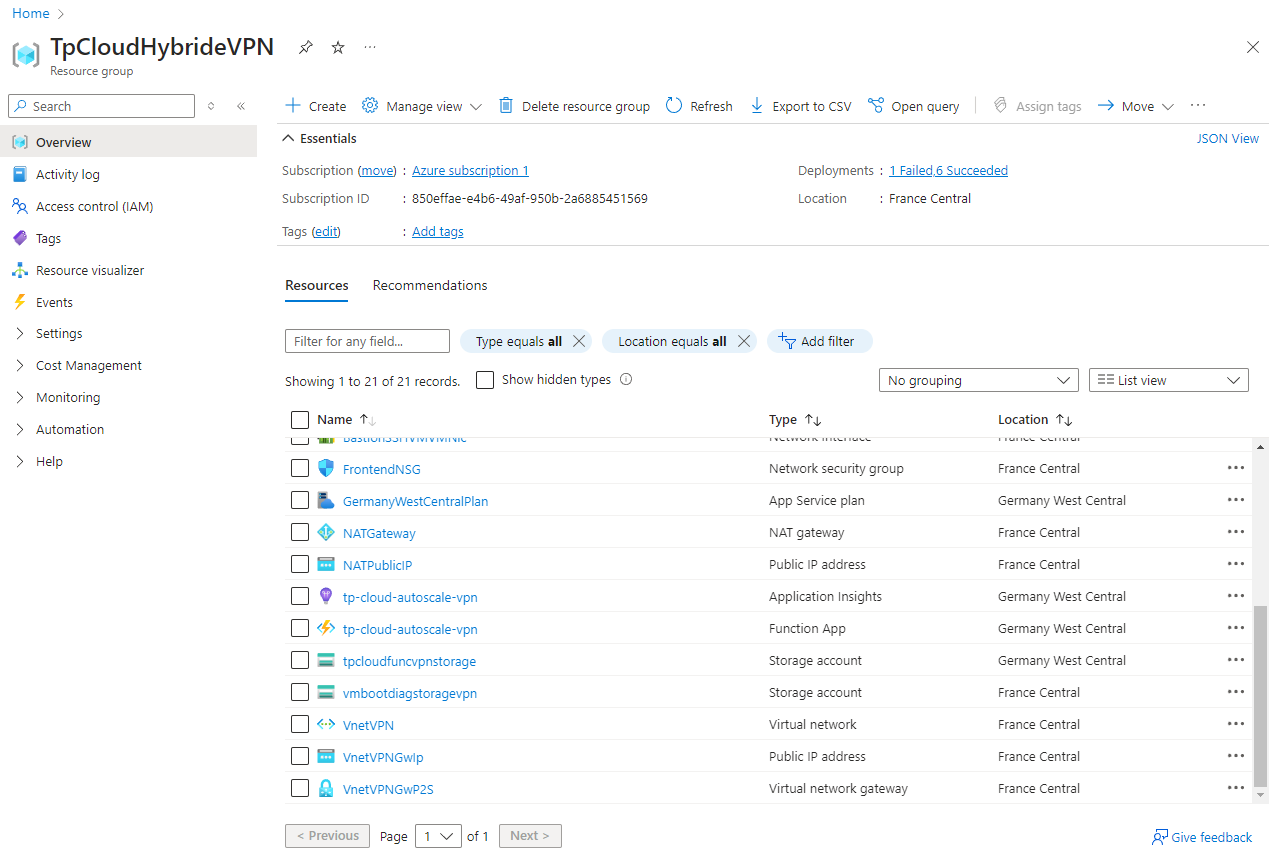
And that’s it, the Azure function will now be visible on the Azure portal among the resources of the associated subscription.
VM initialization script
Ensuring the creation and deletion of VMs on Azure is at the heart of the automatic scalability mechanism we talked about, but it is not enough: you have to configure the VMs for the application you want to run and obviously launch the latter.
Azure offers a very interesting feature for this with the possibility of using cloud-init to launch a bash script on a VM.
cloud-init allows you to declaratively define in yaml the instructions that you want to execute on the target servers when they are created, a bit like Ansible for configuration management.
With Azure CLI, it is then possible to run a script from a cloud-init definition when creating a VM:
az vm create \
  --resource-group myResourceGroup \
  --name vmName \
  --image imageCIURN \
  --custom-data config.yaml \
  --generate-ssh-keys
Unfortunately, this functionality is not available with the Powershell Az module that we use for the Azure Function script.
This is not a problem, however, since we will define the instructions we want to execute when the VM is created by a bash script that we will call init.sh. For this purpose, we will need to:
- install Docker since our application is containerized
- initiate Docker Compose with a service including our application
- launch the application by starting Docker Compose
init.sh
#!/bin/bash

# Installing Docker
sudo apt-get -y update
sudo apt-get -y install ca-certificates curl
sudo install -m 0755 -d /etc/apt/keyrings
sudo curl -fsSL https://download.docker.com/linux/debian/gpg -o /etc/apt/keyrings/docker.asc
sudo chmod a+r /etc/apt/keyrings/docker.asc

echo \
  "deb [arch=$(dpkg --print-architecture) signed-by=/etc/apt/keyrings/docker.asc] https://download.docker.com/linux/debian \
  $(. /etc/os-release && echo "$VERSION_CODENAME") stable" | \
  sudo tee /etc/apt/sources.list.d/docker.list > /dev/null

sudo apt-get -y update
sudo apt-get -y install docker-ce docker-ce-cli containerd.io docker-buildx-plugin docker-compose-plugin
sudo systemctl enable docker
sudo systemctl start docker

# Starting the application with Docker Compose
mkdir -p /home/azureuser/myapp
cd /home/azureuser/myapp

cat >docker-compose.yml <<EOL
services:
  application:
    image: crccheck/hello-world
    container_name: application
    ports:
      - "80:8000"
EOL

sudo docker compose up -d
We can notice that we are logged in with azureuser user which is defined by default on VMs created on Azure. We now have the configuration to apply to the VMs automatically created using the Azure function whose content we will now detail.
We can even go further and create a custom image of VMs using Azure CLI. This way, we would no longer need the init script since the VMs would be directly created from this image.
Azure Function definition and testing
Selecting the language and preparing the development environment
First, we need to select the programming language of the function from those available.
Our choice is Powershell for its simplicity of implementation (no additional packages to deploy) and a native integration with Azure thanks to the Az module in particular.
For comparison, managing dependencies in another language requires storing the third-party libraries either in the project directory itself, or by mounting a file share on Azure as shown in Python for example.
To develop the Powershell script called by the Azure function, we will use Visual Studio Code which offers a development environment dedicated to Azure functions.
We will then be able to access the previously defined Azure function tp-cloud-autoscale-vpn and deploy what we have developed there. Once Visual Studio Code is configured with the instructions in the previous link, we will have a project template based on an HTTP trigger (our case) that will locally create a tree structure of this type:
├── AutoscaleFunction
    ├── autoscale
    │   ├── function.json
    │   ├── run.ps1
    │   └── sample.dat
    ├── autoscale-vpn
    │   ├── function.json
    │   ├── run.ps1
    │   └── sample.dat
    ├── host.json
    ├── local.settings.json
    ├── profile.ps1
    └── requirements.psd1
So we named our project AutoscaleFunction and we defined in it two applications autoscale and autoscale-vpn (the one we will deploy). These are based on the same configuration at the root of the project consisting of the following files, initiated by Visual Studio Code:
host.json: metadata file containing configuration settings applied to all Azure functions in the project. In our case, we do not modify it.local.settings.json: allows you to keep the definition of settings to be able to run the functions locally. In our case, these are mainly environment variables used by the script. It is not intended to be deployed in the final Azure function.
{
  "IsEncrypted": false,
  "Values": {
    "AzureWebJobsStorage": "",
    "FUNCTIONS_WORKER_RUNTIME_VERSION": "7.2",
    "FUNCTIONS_WORKER_RUNTIME": "powershell",
    "MAX_NB_VM": 2,
    "RESOURCE_GROUP": "TpCloudHybrideVPN",
    "LOCATION": "francecentral",
    "VNET_NAME": "VNetVPN",
    "SUBNET_NAME": "Frontend",
    "NETWORK_SG_NAME": "FrontendNSG",
    "STORAGE_ACCOUNT_NAME": "tpcloudfuncvpnstorage",
    "BOOTDIAG_STORAGE_ACCOUNT_NAME": "vmbootdiagstoragevpn",
    "SSH_PUBLIC_KEY": "ssh-ed25519 AAAAC3NzaC1lZDI1NTE5AAAAILMaFCF87N0L+YZkPuBpu6ikx68q+wFAA10/mSnrqnyS",
    "PASSWORD": "XXXXXXXXXXXXXXXXXXXX",
    "INIT_SCRIPT_CONTAINER": "init-script-vm",
    "INIT_SCRIPT_NAME": "init.sh",
  }
}
profile.ps1: specific to Powershell, defines commands executed before launching the project’s Azure functions (in particular authentication). Here again, we leave it as is.requirements.psd1: this file gathers the dependencies in Powershell modules of the script called by the Azure function. In our case, we indicate version 5 of theAzmodule.
# This file enables modules to be automatically managed by the Functions service.
# See https://aka.ms/functionsmanageddependency for additional information.
#
@{
    'Az'='5.*'
}
Finally, when creating an HTTP trigger function with Visual Studio Code, a subdirectory is created with the following files:
function.json: Contains the http trigger settings of the Azure Function, for incoming requests and responses provided by the function.
{
  "bindings": [
    {
      "authLevel": "anonymous",
      "type": "httpTrigger",
      "direction": "in",
      "name": "Request",
      "methods": [
        "get",
        "post"
      ]
    },
    {
      "type": "http",
      "direction": "out",
      "name": "Response"
    }
  ]
}
run.ps1: the big piece, the Powershell script ensuring the creation and deletion of VMs which we will detail just after.sample.dat: sample file for testing purposes, not used in our case.
Autoscaling Powershell script
In this part, we will detail the content of the run.ps1 script, launched by the Azure function, which will be responsible for creating/deleting VMs according to the HTTP requests received on the respective endpoints.
This is what we will call the application associated with the previously created Azure Function. It will be available as an API at a URL generated specifically for the Azure Function.
Let us recall the specifications that the script must respect:
- the maximum number of VMs is two
- the VMs are of class Standard_B1s (1 vCpu, 1 GB RAM) and their OS is Debian 12, like the VM of the local network
- the IP address of the VMs is determined: 10.1.0.100 and 10.1.0.101
- an initialization script
init.shmust be launched at startup
We will logically offer 2 endpoints which will be accessible from the Azure function URL https://<nom fonction Azure> .azurewebsites.net/api/<nom application> :
create: creates a VM with the expected characteristics if there are less than 2delete: deletes a VM previously created by the function
For example, to create a VM, we must call the endpoint https://tp-cloud-autoscale-vpn.azurewebsites.net/api/autoscale-vpn?action=create in our case (function tp-cloud-autoscale and application autoscale-vpn). In this way, we have a serverless API that can be requested by the monitoring tools in order to automatically scale our application.
Now here is the run.ps1 script that makes up the autoscale-vpn application:
using namespace System.Net

# Retrieving the content of the request, by GET or POST
param($Request)

$action = $Request.Query.action
if (-not $action) {
    $action = $Request.Body.action
}

Write-Output "INFO - Action is : $action"

# Using environment variables for other settings
$maxNbVm = $env:MAX_NB_VM
$resourceGroupName = $env:RESOURCE_GROUP
$location = $env:LOCATION
$vNetName = $env:VNET_NAME
$subnetName = $env:SUBNET_NAME
$nsgName = $env:NETWORK_SG_NAME
$storageAccountName = $env:STORAGE_ACCOUNT_NAME
$bootdiagStorageAccountName = $env:BOOTDIAG_STORAGE_ACCOUNT_NAME
$sshPublicKey = $env:SSH_PUBLIC_KEY
$password = $env:PASSWORD
$initScriptContainer = $env:INIT_SCRIPT_CONTAINER
$initScriptName = $env:INIT_SCRIPT_NAME

Write-Output "INFO - Resource group is : $resourceGroupName"

# Azure Account Login
Connect-AzAccount -Identity

#############
# Functions #
#############

# Function to create a VM
function New-VM {
    # Automatic generation of VM and NIC names
    $randValue = Get-Random -Minimum 1000 -Maximum 9999
    $vmName = "AutoScaledVM" + $randValue
    $nicName = "AutoScaledNIC" + $randValue

    # Check the number of existing VMs with the "AutoScaled" tag
    $vms = Get-AzVM -ResourceGroupName $resourceGroupName | Where-Object { $_.Tags["AutoScaled"] -eq "true" }
    if ($vms.Count -ge $maxNbVm) {
        $returnObj = "" | Select-Object -Property body,status,httpStatus
        $returnObj.body = "Maximum number of auto-scaled VMs reached"
        $returnObj.status = "OK"
        $returnObj.httpStatus = "OK"
        return $returnObj
    }
    Write-Output "INFO - There are currently $($vms.Count) autoscaled VM running over a maximum number of $maxNbVm."

    # Place the virtual network in a variable
    $net = @{
        Name              = $vNetName
        ResourceGroupName = $resourceGroupName
    }
    $vnet = Get-AzVirtualNetwork @net

    # Retrieve the subnet in which we want to create the VM
    $subnet = Get-AzVirtualNetworkSubnetConfig -Name $subnetName -VirtualNetwork $vnet

    # Place the network security group in a variable
    $ns = @{
        Name              = $nsgName
        ResourceGroupName = $resourceGroupName
    }
    $nsg = Get-AzNetworkSecurityGroup @ns

    # Create the network interface with a specific private IP address
    # from subnet range and number of VMs created
    $subnetIpRange = [System.Net.IPAddress]::Parse($subnet.AddressPrefix.Split('/')[0])
    $newIp = $subnetIpRange.GetAddressBytes()
    # Increment the trailing byte for each new VM starting from 100
    $newIp[3] = $newIp[3] + 100 + $vms.Count
    $calculatedIp = [System.Net.IPAddress]::new($newIp)
    Write-Output "INFO - New VM static IP adress will be : $calculatedIp"

    $ipConfig = New-AzNetworkInterfaceIpConfig -Name "IpConfig$vmName" -Subnet $Subnet -PrivateIpAddress $calculatedIp

    $nic = @{
        Name                 = $nicName
        ResourceGroupName    = $resourceGroupName
        Location             = $location
        NetworkSecurityGroup = $nsg
        IpConfiguration      = $ipConfig
    }
    $nicVM = New-AzNetworkInterface @nic

    # Configure VM type
    $vmsz = @{
        VMName = $vmName
        VMSize = 'Standard_B1s'
    }

    # Defining credentials (azureuser / $password)
    $securePassword = ConvertTo-SecureString $password -AsPlainText -Force
    $cred = New-Object System.Management.Automation.PSCredential ("azureuser", $securePassword)

    # SSH OS Definition for Linux
    $vmos = @{
        ComputerName                  = $vmName
        Credential                    = $cred
        DisablePasswordAuthentication = $true
    }

    $vmimage = @{
        PublisherName = 'Debian'
        Offer         = 'debian-12'
        Skus          = '12'
        Version       = 'latest'
    }

    # Waiting loop for the network interface to be created successfully
    $nicExists = $false
    $maxRetries = 3
    $retryCount = 0
    while (-not $nicExists -and $retryCount -lt $maxRetries) {
        try {
            $nic = Get-AzNetworkInterface -ResourceGroupName $resourceGroupName -Name $nicName -ErrorAction Stop
            $nicExists = $true
        } catch {
            Write-Host "Network interface $nicName not yet created. Waiting during 2 seconds..."
            Start-Sleep -Seconds 2
            $retryCount++
        }
    }

    $vmConfig = New-AzVMConfig @vmsz
    $vmConfig = Set-AzVMOperatingSystem -VM $vmConfig @vmos -Linux
    $vmConfig = Set-AzVMSourceImage -VM $vmConfig @vmimage
    $vmConfig = Add-AzVMNetworkInterface -VM $vmConfig -Id $nicVM.Id
    # Setting storage account for VM boot diagnostics
    $vmConfig = Set-AzVMBootDiagnostic -VM $vmConfig -Enable -ResourceGroupName $resourceGroupName -StorageAccountName $bootdiagStorageAccountName

    # Add SSH key if Linux
    $vmssh = @{
        VM = $vmConfig
        KeyData = $sshPublicKey
        Path = "/home/azureuser/.ssh/authorized_keys"
    }
    Add-AzVMSshPublicKey @vmssh

    ## Create the VM from the previously defined configuration ##
    $tags = @{AutoScaled="true"}

    $vm = @{
        ResourceGroupName = $resourceGroupName
        Location          = $location
        Zone              = 1
        Tag               = $tags
        VM                = $vmConfig
    }

    try {
        $vmCreated = New-AzVM @vm
        if ($vmCreated) {
            # If the VM is created, we launch the script which will install Docker
            # And launch the application with docker compose
            Write-Output "INFO - New VM $vmName successfully created, now executing the init script."

            $storageAccountKey = (Get-AzStorageAccountKey -ResourceGroupName $resourceGroupName -AccountName $storageAccountName)[0].Value
            $storageContext = New-AzStorageContext -StorageAccountName $storageAccountName -StorageAccountKey $storageAccountKey
            $blobUri = (Get-AzStorageBlob -Context $storageContext -Container $initScriptContainer -Blob $initScriptName).ICloudBlob.Uri.AbsoluteUri

            $Params = @{
                ResourceGroupName  = $resourceGroupName
                VMName             = $vmName
                Location           = $location
                Name               = "VMInitScript"
                Publisher          = 'Microsoft.Azure.Extensions'
                ExtensionType      = 'CustomScript'
                TypeHandlerVersion = '2.1'
                Settings           = @{fileUris = @($blobUri); commandToExecute = "./$initScriptName"}
                ProtectedSettings  = @{storageAccountName = $storageAccountName; storageAccountKey = $storageAccountKey}
            }

            try {
                Set-AzVMExtension @Params
                Write-Output "INFO - Init script correctly executed"
                $body = "VM $($vmName) successfully created and init script correctly executed"
                $status = "OK"
                $httpStatus = "OK"
            } catch {
                Write-Output "ERROR - An error occured during init script execution"
                Write-Output $_
                $body = "VM $($vmName) successfully created but init script failed. Please execute it directly on the VM."
                $status = "WARNING"
                $httpStatus = "OK"
            }
        } else {
            $body = "ERROR : NIC $($nicVM.Name) created but VM $($vmName) failed to be created"
            $status = "KO"
            $httpStatus = "InternalServerError"
        }
    } catch {
        $body = "ERROR : NIC $($nicVM.Name) created but VM $($vmName) failed to be created"
        $status = "KO"
        $httpStatus = "InternalServerError"
    }

    $returnObj = "" | Select-Object -Property body,status,httpStatus
    $returnObj.body = $body
    $returnObj.status = $status
    $returnObj.httpStatus = $httpStatus
    return $returnObj
}

# Function to delete a VM
function Remove-VM {
    # Delete a random auto-scaled VM
    $vms = Get-AzVM -ResourceGroupName $resourceGroupName | Where-Object { $_.Tags["AutoScaled"] -eq "true" }
    if ($vms.Count -gt 0) {
        $vmToDelete = $vms | Get-Random
        $nicToDelete = $vmToDelete.NetworkProfile.NetworkInterfaces.Id.Split('/')[-1]
        $diskToDelete = $vmToDelete.StorageProfile.OsDisk.Name

        # Delete the VM
        Remove-AzVM -ResourceGroupName $resourceGroupName -Name $vmToDelete.Name -Force

        # Delete network interface
        Remove-AzNetworkInterface -ResourceGroupName $resourceGroupName -Name $nicToDelete -Force

        # Delete disk
        Remove-AzDisk -ResourceGroupName $resourceGroupName -DiskName $diskToDelete -Force

        $body = "VM $($vmToDelete.Name), NIC $($nicToDelete) and disk $($diskToDelete) deleted"
        $status = "OK"
        $httpStatus = "OK"
    } else {
        $body = "No auto-scaled VMs to delete"
        $status = "OK"
        $httpStatus = "OK"
    }

    $returnObj = "" | Select-Object -Property body,status,httpStatus
    $returnObj.body = $body
    $returnObj.status = $status
    $returnObj.httpStatus = $httpStatus
    return $returnObj
}

########
# Main #
########

# Creation or deletion of VM depending on the value
# of the "action" field provided in the incoming request
if ($action -eq "create") {
    Write-Output "INFO - Creating a new VM"
    $returnObj = New-VM
} elseif ($action -eq "delete") {
    Write-Output "INFO - Removing an existing VM"
    $returnObj = Remove-VM
} else {
    Write-Output "ERROR - Invalid parameters in the request"
    $returnObj = "" | Select-Object -Property body,status,httpcode
    $returnObj.body = "Invalid request"
    $returnObj.status = "KO"
    $returnObj.httpStatus = BadRequest
}

# Sending the response
Push-OutputBinding -Name Response -Value ([HttpResponseContext]@{
    StatusCode = $returnObj.httpStatus
    Headers = @{
        "Content-type" = "application/json"
    }
    # Keeps the data ordered as shown in the json output
    Body = [Ordered]@{
        "Status" = $returnObj.status
        "Msg" = $returnObj.body
    } | ConvertTo-Json
})
Some remarks on the content of the script:
- The script accepts HTTP GET or POST requests, and returns the status of the requested task in the response body.
- A VM creation consists of 3 Azure resources: the VM itself, the network card (NIC, Network Interface Card) and the associated disk.
- Created VMs are assigned the network security group
FrontendNSGin their NIC configuration. - The
Autoscaledtag set totrueallows you to identify the VMs created to ensure the scaling of the application (the maximum number of which is 2) - Assigning a static IP address to VMs (10.1.0.100 or 10.1.0.101) requires creating an IP interface configuration object with the following command, which will then be applied to the network card.
$ipConfig = New-AzNetworkInterfaceIpConfig -Name "IpConfig$vmName" -Subnet $Subnet -PrivateIpAddress $calculatedIp
- Since the creation of the network card (NIC) can take a few seconds, it was necessary to create a waiting loop before launching the creation of the VM.
- The
init.shinitialization script is retrieved from the Azure blob storage container associated with the provided storage account and then launched by calling the Powershell functionSet-AZVMExtensionwith the following parameters:
$Params = @{
    ResourceGroupName  = $resourceGroupName
    VMName             = $vmName
    Location           = $location
    Name               = "VMInitScript"
    Publisher          = 'Microsoft.Azure.Extensions'
    ExtensionType      = 'CustomScript'
    TypeHandlerVersion = '2.1'
    Settings           = @{fileUris = @($blobUri); commandToExecute = "./$initScriptName"}
    ProtectedSettings  = @{storageAccountName = $storageAccountName; storageAccountKey = $storageAccountKey}
}
Azure Function configuration and application deployment
In order to configure the function so that it can run the application that we are going to deploy, we need to go to the Azure portal and perform the following tasks on the Azure function page:
- Add Microsoft as identity provider in Settings -> Authentication
- Create a system assigned identity (Settings -> Identity) and add a role with Contributor rights on the resource group
- Only allow the VPN client IP range in Settings -> Networking (since the Azure function URL is a priori public)
- Create the environment variables required by the function in Settings -> Environment variables, here is the list in our case with their respective values:
MAX_NB_VM:                      2
RESOURCE_GROUP:                 TpCloudHybrideVPN
LOCATION:                       francecentral
VNET_NAME:                      VNetVPN
SUBNET_NAME:                    Frontend
NETWORK_SG_NAME:                FrontendNSG
STORAGE_ACCOUNT_NAME:           tpcloudfuncvpnstorage
BOOTDIAG_STORAGE_ACCOUNT_NAME:  vmbootdiagstoragevpn
SSH_PUBLIC_KEY:                 xxxxxxxxxxxx
PASSWORD:                       XXXXXXXXXXX
INIT_SCRIPT_CONTAINER:          init-script-vm
INIT_SCRIPT_NAME:               init.sh
Then, the deployment of the autoscale-vpn application for which we developed the previous Powershell script is done very simply using Visual Studio Code.
Azure Function testing
First, we will call the Azure function endpoint responsible for creating VMs several times:
curl https://tp-cloud-autoscale-vpn.azurewebsites.net/api/autoscale-vpn?action=create
The first two times we get a message indicating the creation of a VM:
{
  "Status": "OK",
  "Msg": "VM AutoscaledVM1734 successfully created and init script correctly executed"
}
Then the return message indicates as expected that it is not possible to create additional VMs since the maximum number has already been reached.
{
  "Status": "OK",
  "Msg": "Maximum number of auto-scaled VMs reached"
}
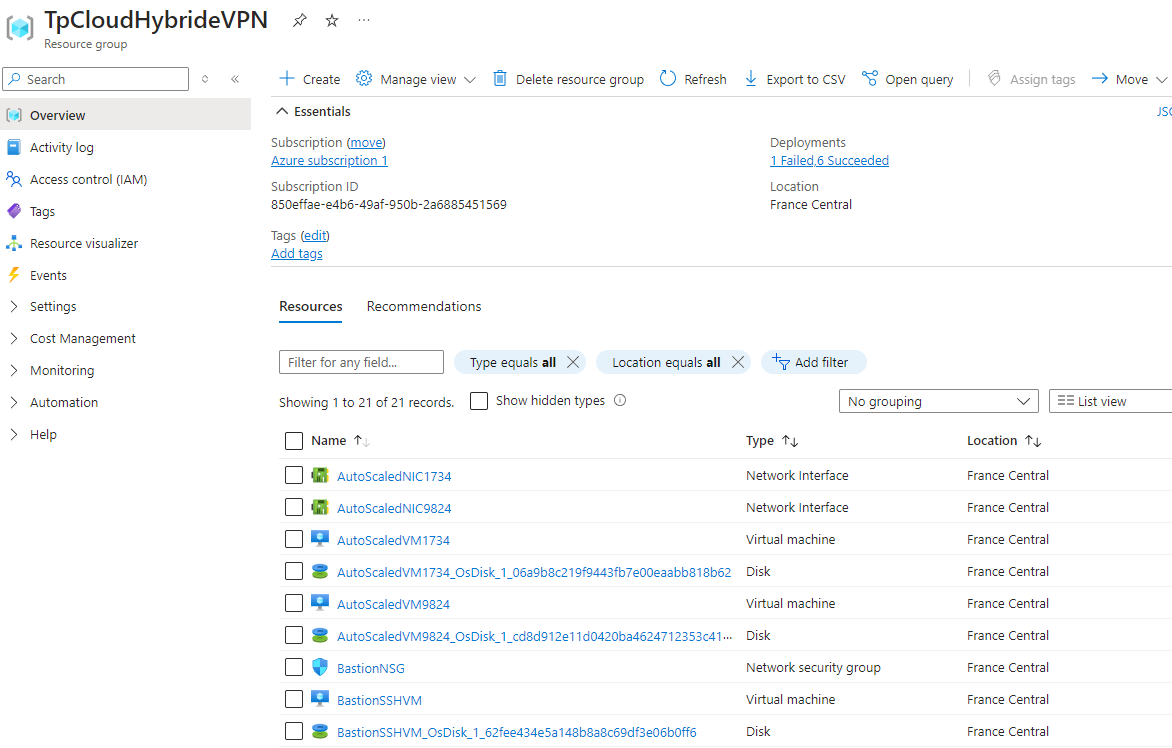
If we go to the Azure portal and consult the list of resources for the subscription, we can clearly see the two VMs as well as the disk and network card associated with them.
The Azure portal also provides the ability to access the environment where the Azure Function application is running, and view the standard output to investigate possible issues. To do this, go to the Monitor tab available in the Azure Function menu.
In our case, the output of our application is as follows when creating a VM:
2024-07-18T12:56:25.578 [Information] Executing 'Functions.autoscale-vpn' (Reason='This function was programmatically called via the host APIs.', Id=c67ff4f2-5158-4d67-b0b8-0547861c8238)
2024-07-18T12:56:25.597 [Information] OUTPUT: INFO - Action is : create
2024-07-18T12:56:25.600 [Information] OUTPUT: INFO - Resource group is : TpCloudHybrideVPN
2024-07-18T12:56:26.246 [Information] OUTPUT:
2024-07-18T12:57:19.369 [Information] INFORMATION: Selecting “North Europe” may reduce your costs. The region you’ve selected may cost more for the same services. You can disable this message in the future with the command “Update-AzConfig -DisplayRegionIdentified $false”. Learn more at https://go.microsoft.com/fwlink/?linkid=2225665
2024-07-18T12:57:24.233 [Warning] WARNING: The output of cmdlet Get-AzStorageAccountKey may compromise security by showing the following secrets: Value. Learn more at https://go.microsoft.com/fwlink/?linkid=2258844
2024-07-18T12:57:24.290 [Warning] WARNING: The output of cmdlet New-AzStorageContext may compromise security by showing the following secrets: TableStorageAccount.Credentials.Key, ConnectionString. Learn more at https://go.microsoft.com/fwlink/?linkid=2258844
2024-07-18T12:57:24.536 [Warning] WARNING: The output of cmdlet Get-AzStorageBlob may compromise security by showing the following secrets: Context.TableStorageAccount.Credentials.Key, Context.ConnectionString. Learn more at https://go.microsoft.com/fwlink/?linkid=2258844
2024-07-18T12:58:56.641 [Information] OUTPUT: Subscription name    Tenant
2024-07-18T12:58:56.641 [Information] OUTPUT: -----------------    ------
2024-07-18T12:58:56.641 [Information] OUTPUT: Azure subscription 1 cd075fd5-dafc-45de-9357-b983733f4ca7
2024-07-18T12:58:56.642 [Information] OUTPUT: INFO - Creating a new VM
2024-07-18T12:58:56.642 [Information] OUTPUT:
2024-07-18T12:58:56.643 [Information] Executed 'Functions.autoscale-vpn' (Succeeded, Id=c67ff4f2-5158-4d67-b0b8-0547861c8238, Duration=151064ms)
Now we will test the SSH connection to the VMs through the bastion we previously created.
To do this, you need to edit the ~/.ssh/config file of the current Linux session. The two SSH keys used (one for the bastion VM, the other for the autoscale VMs)
are those whose public key was communicated when the VMs were created.
Host azure-bastion
        HostName 10.1.1.4
        User azureuser
        IdentityFile ~/.ssh/id_ed25519_azure_bastion

Host vm-autoscale-1
        HostName 10.1.0.100
        ProxyJump azure-bastion
        User azureuser
        IdentityFile ~/.ssh/id_ed25519_azure

Host vm-autoscale-2
        HostName 10.1.0.101
        ProxyJump azure-bastion
        User azureuser
        IdentityFile ~/.ssh/id_ed25519_azure
The ProxyJump configuration setting of autoscale VMs indicates that the connection is directed to the bastion VM which will act as a bounce.
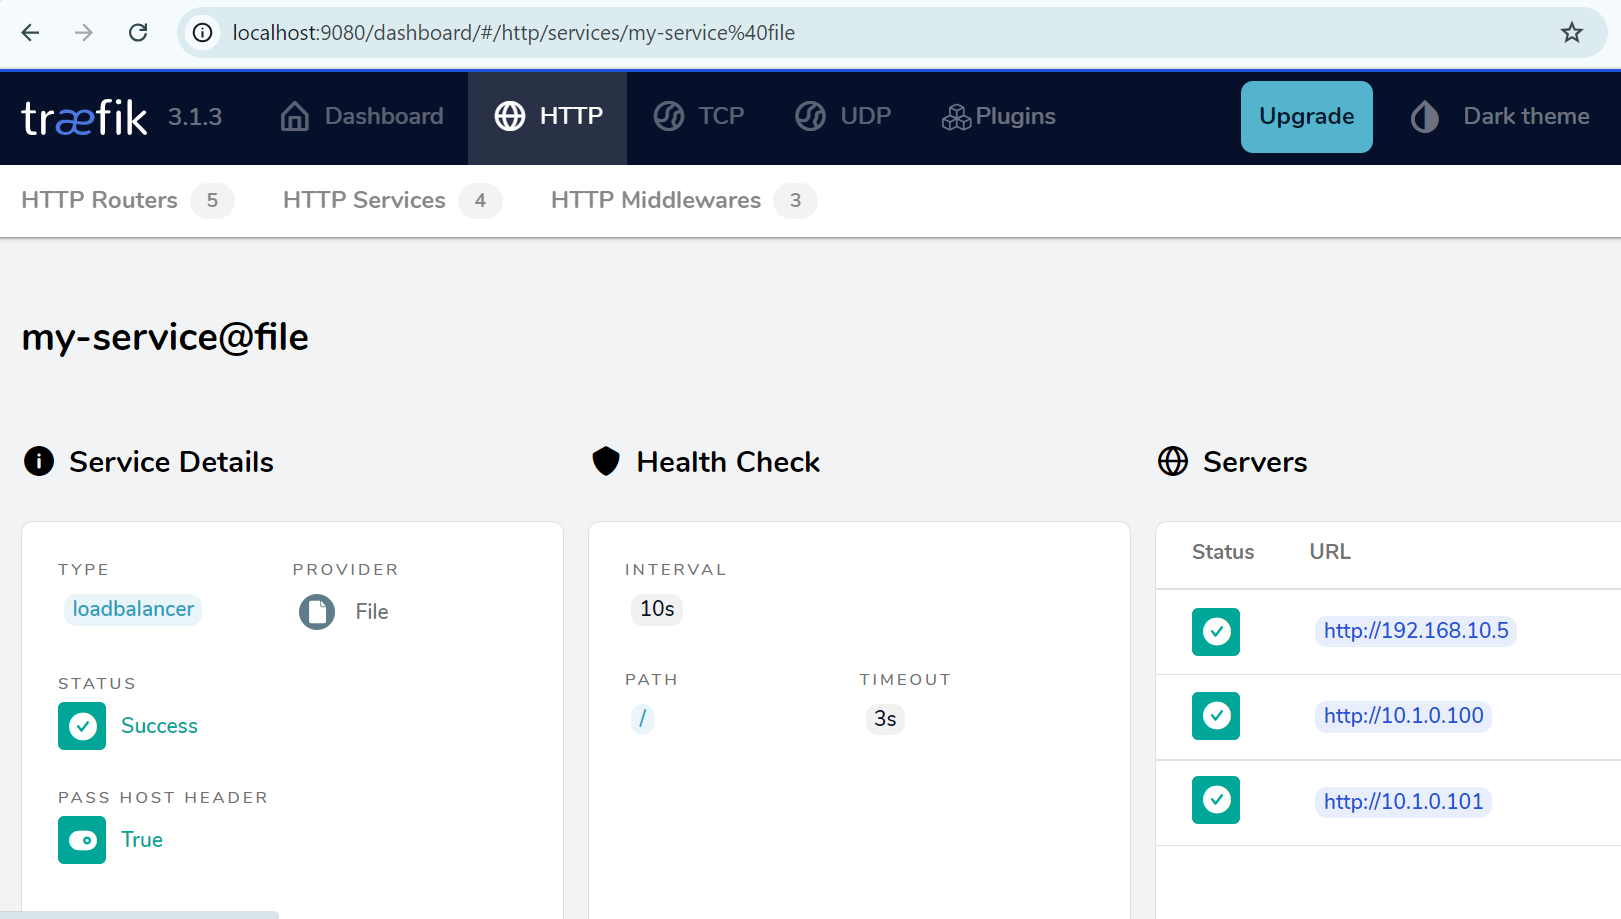
By connecting to one of the VMs, we can see that the initialization script has been executed and that the application container is running.

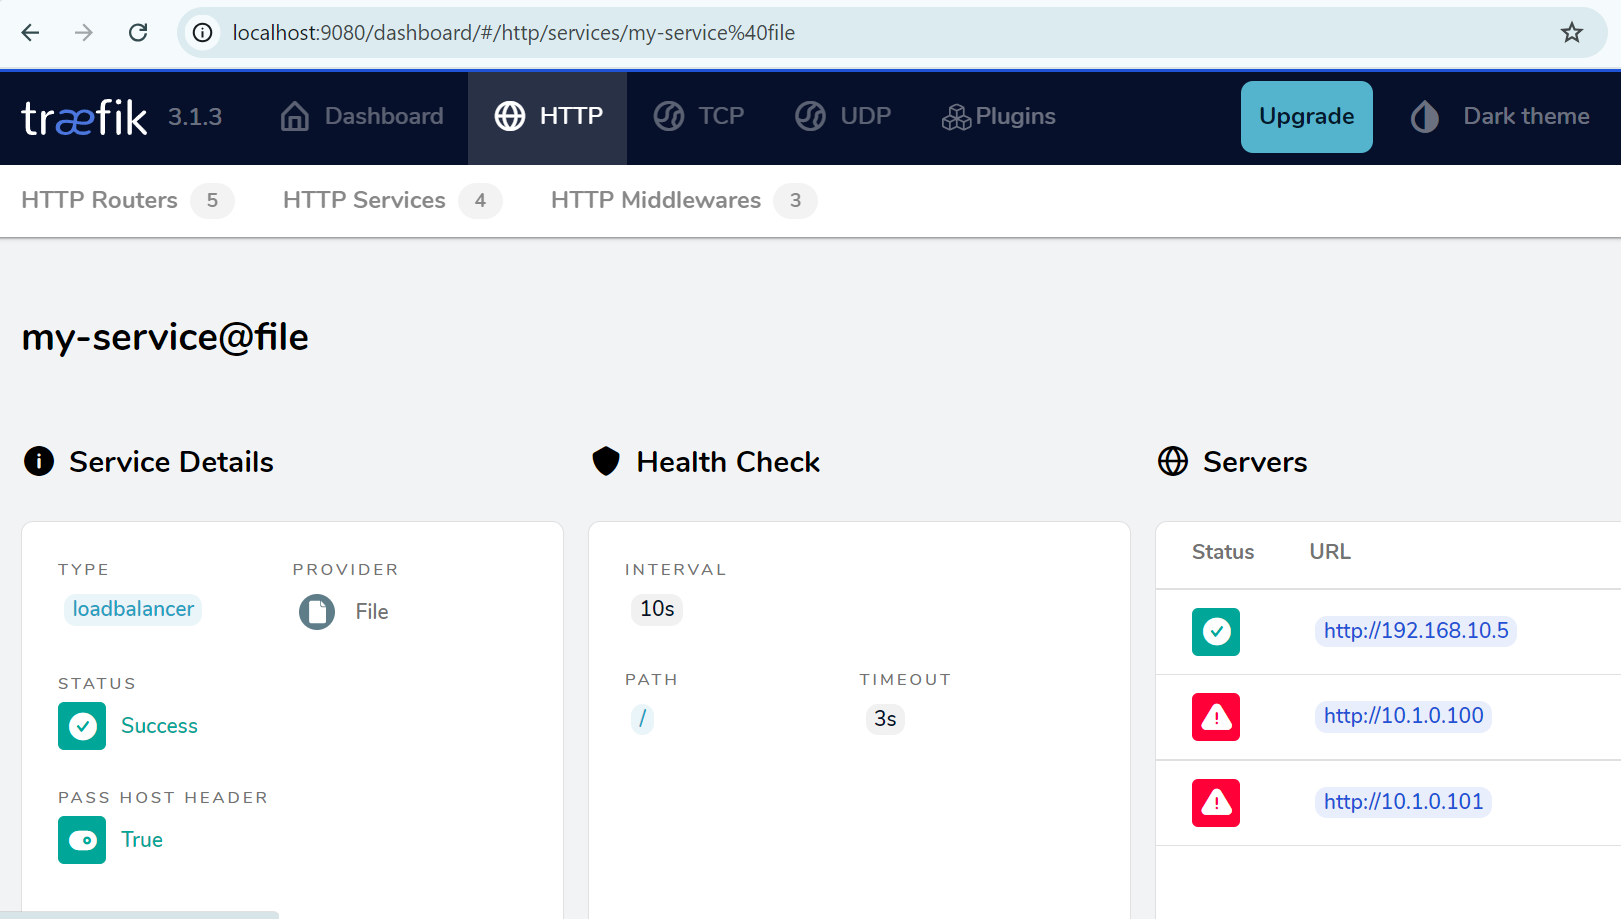
This way, traffic can now be routed to the autoscale VMs as seen on the Traefik load balancer dashboard.
Now we will call the Azure Function API twice to delete the VMs.
curl https://tp-cloud-autoscale-vpn.azurewebsites.net/api/autoscale-vpn?action=delete
The return message is as follows, for each of the VMs:
{
  "Status": "OK",
  "Msg": "VM AutoscaledVM1734, NIC AutoscaledNIC1734 and disk AutoscaledVM1734_OsDisk_1_06a9b8c219f9443fb7e00eaabb818b62 deleted"
}
We have the below log message on the Azure Function console (Monitor tab of the function menu on the portal):
2024-07-18T10:13:12.723 [Information] Executing 'Functions.autoscale-vpn' (Reason='This function was programmatically called via the host APIs.', Id=4d534ed1-7f5d-4de4-b268-f4eca256d978)
2024-07-18T10:13:12.784 [Information] OUTPUT: INFO - Action is : delete
2024-07-18T10:13:12.787 [Information] OUTPUT: INFO - Resource group is : TpCloudHybrideVPN
2024-07-18T10:13:13.311 [Information] OUTPUT:
2024-07-18T10:14:35.736 [Information] OUTPUT: Subscription name    Tenant
2024-07-18T10:14:35.745 [Information] OUTPUT: -----------------    ------
2024-07-18T10:14:35.749 [Information] OUTPUT: Azure subscription 1 cd075fd5-dafc-45de-9357-b983733f4ca7
2024-07-18T10:14:35.750 [Information] OUTPUT: INFO - Removing an existing VM
2024-07-18T10:14:35.750 [Information] OUTPUT:
2024-07-18T10:14:35.751 [Information] Executed 'Functions.autoscale-vpn' (Succeeded, Id=4d534ed1-7f5d-4de4-b268-f4eca256d978, Duration=83030ms)
And we see the return to the initial situation on the Traefik dashboard.
